Sunday, February 27, 2011

A Birthday Cake for My Mum

Yesterday was a happy and tired day for me. Have been baking the whole night before yesterday, and frosting and decorating cakes the next morning. There were 2 birthday cakes to prepare and I'll like to do my best to make the cake look pretty. One was for my neighbour birthday girl, she has not much request on the deco anyway, but for a 4 years old girl, I think she likes something cute and colourful..heehee! I didn't load up the photo here because its the common chocolate cake I baked before and the decorations were quite simple with a pinky teddy bear on it.
The cake shown here was for my mum. Actually her birthday falls on the coming weekday but we had an early celebration for her last night. Well, it was a simple celebration which we had a cutting cake session for tea then a western dinner at a so-so restaurant nearby. By the way, there is no nice and classy restaurant found in my hometown....haha!

Walnut Mocha Cream Cake


To make it simple, I didn't bake my own sponge this time. So end up using the sponge mix I got from the bakery store. Not bad at all...:)
Recipe adapted from Kevin Chai

Recipe for the Sponge:
180g sponge mix
3 eggs
45ml fresh milk
100g walnut (chopped)
60g butter (melted)

Recipe for the Mocha Cream:
200g fresh cream (whipped)
20g mocha paste

Topping:
Some melted Valrhona Chocolate
Fresh Strawberries

Method:
~ To make the sponge, preheat oven at 180'C, line a bottom of a 7" round cake tin with greaseproof paper.
~ Beat sponge mix, eggs and milk with high speed until light and fluffy. (about 8-10 mins)
~ Fold in chopped walnuts and mix in melted butter until well blended.
~ Spread batter into prepared tin and bake for 30 mins. Remove from oven and cool completely, then sliced into 3 layers.
~ To make the mocha cream, just add in the mocha paste into the whipped cream and mix well.
~ Sandwich the sponge with the cream and coat the cake with remaining cream. Refrigerate for a while.
~ Melt some valrhona chocolate and pour over the cake. Refrigerate for a while. Then decorate with some fresh strawberries.

The texture of the cake was not those smooth ones because of the chopped walnuts added. But it tasted pretty good with the crisp of the nuts and the taste of the coffee cream. All my mum's favourite was in this cake....:) Well, except the strawberris...haha! All her grandchildren grabbed the fresh fruits instead.


Happy Birthday Mum!!


Thursday, February 24, 2011

Butter Cinnamon Rolls

What's for breakfast this morning? This is the question that you'll probably ask every morning. Do you?...haha! We did!! Every morning we will crack our head for what to eat before we start our day, and if we were out late to office that day we will prabably grab some bread with butter or jam and a cup of coffee.
Well, but not today! I've baked some cinnamon rolls this morning and we did had a good breakfast before we go. You'll probably think that I have to knead and rise the dough in the middle of the night..huh...;p Nope!! This recipe is a quick and easy one and you'll get a fresh and soft cinnamon bread right away!!

I've done this long time ago, and don't ask me why I've only do it again now...haha! Too many recipes in my to-do-list! The recipe was adapted from a simple DIY book, but with some changes I made up myself..;p

Recipe:
280g Bread flour
15g Milk powder
60g castor sugar
1/2 tsp salt
70g water
6g instant yeast
100g fresh milk
50g butter
Method:
~ Mix all ingredients together except butter in a mixer, mix until a dough forms.
~ Add in butter and knead until you get an elastic dough.
~ Brush a deep bowl with some butter, and leave the dough to rise in it for 1 hour. (covered with cling wrap)
~ Then transfer it into the fridge and chill over night.
~ Take out the dough from the fridge and let it stand for 5 minutes, then roll flat.
~ Brush a thin layer of butter on the flat dough and sprinkle enough cinnamon powder and brown sugar as you desire.
~ Roll up like a swiss roll and cut into sections.
~ Place on a greased pan and let it double in size for 10 minutes. Brush with beaten eggs.
~ Bake in preheated oven, 190'C for 20 minutes.


See the texture here...it was unexpectedly soft!
The recipe makes 8 (slightly smaller than those selling outside).
Let me tell you how I plan my time for this recipe. I've started to make the dough at 9pm then chilled the dough at around 10pm++. This morning I started at 830am, then we had a great breakfast by 9am...:)
Its just that simple, and you get what you want..:)


Cheers!! Have a nice day...:)


Friday, February 18, 2011

Strawberry Cheesecake

This Chinese New Year was the most enjoyable and excited one for me. I have visitors come and go during the whole clebration. And not to forget about the food....I had the most yummilicious one!!..haha! Now I have to start my diet all over again...LOL..;p
Ok, this post was my last bake for this Chinese New Year. A Strawberry Cheesecake for my dear cousin brother and his wife before they leave for Australia. Never thought they love it so much, and bring home the other half..haha!

A recipe adapted from Kevin Chai but this time I did it with strawberry instead. Oh, this was my 2nd attempt...the 1st was blackberries. This time was done with 3 small 4" round pan instead on a 9" square one.
You can get the recipe here.

My daughter is a big fan of this cake. She called it an ice-cream cake instead..;p So you can imagine the texture with her comment...haha!
Maybe I'll try some other berries for this recipe next time. Blueberries or rapsberries...yummy!
I'll like to wish all of you a happy year ahead, and back to the normal routine after all the relax and eatings past few weeks...:) Btw, I'm looking forward to the next holidays already..lol!!
Cheers!!


Wednesday, February 16, 2011

Abacus Beads (算盘子)

I have always wanted to learn this dish from my mother. And I finally got the chance during this Chinese New Year. This is not that difficult as I thought but you must have a tough hands. Oh why tough hands?....That's because you have to knead the hot yam once after steam together with the hot water.....HOT!!


We had this on the 2nd day of Chinese New Year for lunch. And this dish is a must during this festive season. "Xuan Pan" ( 算盘) means abacus, the more you eat the more you can calculate the $$..haha! Well, well lets see how much I can get this year...LOL!!
The photo belows showed how the dough looks like after kneading (Oh, that's my mother's hands, not mine...haha! I just can't stand the "hot"!!) Anyway I did help for moulding the beads.

Recipe for the yam dough:
200g Yam / Taro
100g Tapioca flour
1/4 tsp salt
1/4 tsp five spice powder

Method:
~ Slice yam into 1" thick, place in the pot fill with water (water level just to cover the yams)
~ Cook for about 15 minutes or until soft
~ Mashed yam together with the water, then add in remaining ingredients and knead into a soft dough. (may add alittle warm water if dough is dry)
~ Keep kneading the dough until smooth but not sticky.
~ Take a small piece of dough and mould into small abacus beads.
~ Bring to boil a pot of water and cook the beads for about 10-15 minutes. They're cook once floated.
~ Drain and transfer into a bowl. Add 1 tbsp cookingl and mix well. This to prevent the beads from sticking each other.

Ingredients for the accompaniment (for 1/2 portion of the abacus beads):
4-5 tbsps cooking oil
100g minced meat (usually its pork)
3-4 black fungus (shredded)
30g dried shrimps (diced) 5 chinese mushrooms (soaked & shredded)
3 pieces dried beancurd (shredded)
10 shallots (diced)
a little garlic (diced)

Seasoning:
2 tbsps oyster sauce
a little salt
50ml water
** some coriander for garnishing

~ Heat up oil, panfry shallots and grlic until fragnant.
~ Add in minced meat, stirfry until almost cook then add in remaining ingredients.
~ Add in half portion of the cooked abacus beads then follow with the seasoning. Continue stirfry until almost dry.
~ Garnish with some coriander and serve.

Texture was so chewy and the taste was just right to our bud. Hope you like this wonderful recipe from my mum...:)

Happy Cooking!!


Monday, February 14, 2011

Bloggers Gatherings During CNY

Happy Valentine's Day!!
Anyway this post is not about Valentine but it's the bloggers gathering we had during this Chinese New Year. Althought there were not many of us, we do had a great fun day!! With all the good yummy foods, we actually ate from 430pm to 930pm...haha! I'm starting my diet already...haha! Shall we have another soon? I'm so looking forward to meet up again and hope the others who miss this can join the next time.

A potluck for this gathering, and here's the yummy delicious food we had!

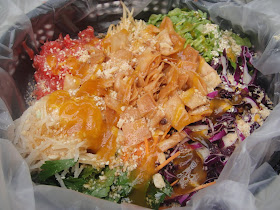
"Yee-Sang" by Sonia, Nasi Lemak Lover
Pickled Cucumber by Venorica, Quay Po Cooks

Vietnamese Springrolls by Swee San, The Sweet Spot

Nasi Kerabu by Swee San, The Sweet Spot & Wendy, Table for 2

Lemon Grass Chicken by me

Otak Otak by Venorica, Quay Po Cooks

"Nian Gao" Puffs by Tracie, Bitter Sweet Flavours

"Bak Kwa" by Wendy, Table for 2

Ispahan Mini Cakes by Swee San, The Sweet Spot

Red Bean Soup by Tracie, Bitter Sweet Flavours
Pandan Lemon Grass Drink by me
Pei-Lin , dodol-mochi brought her rojak, but sorry Pei-Lin, I forgot to take a photo of that...;p
After a warm bbq, we hanged out at my place. We had a good chat until no one noticed how time flies. I wish there will be more to join us the next time, and a longer time to chat....;p

Cheers!!

Wednesday, February 9, 2011

Simple & Quick Banana Muffins with Rapsberries

How's everyone doing? I'm still in the CNY mood, and don't feel like doing anything at all..haha!
Schools starts and I'm back to my daily routine...:(
Somehow, there are something to look foward this weekend...kekeke..;p Oh I'm so looking forward to it..:D Want to know what? Stay tune then...haha! (wicked me!)

Let's see what's my post today...a very simple, yummy banana muffins. And these were actually done by my daughter (with my guidance of course..heehee). You may wonder why not me who was baking...well with my manicure nicely done that day...that is why...haha!
These were baked for our breakfast on the CNY eve.

Soft and delicious, they were all gone during the breakfast..:) See her little hand decorating the rapsberries...haha! She loves to do it..:)
Here's the recipe, need no mixer but only a bowl with a spatula and a spoon.
300g self raising flour
150g brown sugar
1 egg, lightly beaten
180ml fresh milk
1/2 cup mashed bananas
80ml cornoil
Some fresh rapsberries
Method:
~ Preheat oven at 200'C. Meanwhile line muffin cups on the tray. (I used 20 - 3.1/4oz muffin cups)
~ Stir to combine flour and sugar in a bowl, stir in combined egg, milk, mashed bananas and oil until just combine.
~ Spoon mixture into prepared paper cups and top with a fresh rapsberry.
~ Bake for 15 mins, and its all done!
Nicely packed for our trip back that night. Who can resist the warm and freshly baked muffins? I can't...haha! Took one right away..;p


Cheers!!


Friday, February 4, 2011

Triple Decker Nian Gao (Sweet Glutinous Cake)

Hi, how's your Chinese New Year celebrations going on? Today is the 3rd day, and we already had lots and lots of delicious food, gatherings and all happy moments back from hometown.
Back to our home sweet home, after settling down everything I finally have some time to read all the other bloggers posts and all my emails. And of course a short post here to wish everyone a happy holiday and good celebrations...:)

Nian Gao (Sweet Glutinous Cake)...is a traditional MUST-HAVE cake / kueh during Chinese New Year. Oh and this is my whole family's favourite which we usually have it for breakfast on the 2nd day. Somehow this was done and eaten before Chinese New Year starts...haha! Yeah ...we can't wait to taste it!!

The Nian Gao was bought by my mother-in-law from someone whom she knows very well. And we have been buying from her for many many years. After cutting into slices, I sandwiched it with some yam (taro) and sweet potatoes before frying...yummy!!

Here's the recipe for the batter for frying:
80g rice flour
1 tsp tapioca flour
1 tsp baking powder
1/2 tsp salt
1 egg
100-125ml water

~ Sliced the nian gao, yam (taro) and sweet potatoes.
~ Combined batter, rest for 30 minutes. Just prior to deep-frying process., add in 1 tbsp of oil into the batter. Mix well.
~ Sandwich nian gao, yam and sweet potato together, coat with ready batter. Pan fry in hot oil till golden at medium heat for about 5-10 minutes. Remove, drained and serve.


Gong Xi Fa Cai!!