Sunday, April 24, 2011

My PURPLE Day

Hi everyone...Happy Easter!! I had a wonderful day back to my hometown, a good chat with my sister and parents and a nice cosy dinner with just the 3 of us back home...:) Then some durian for dessert to fullfill my day...heehee! What about yours?
Actually I've been invited by Elin from Elinluv's Corner to a tagging menu game to celebrate this Easter but I have not much recipes for this special celebration, so I'm afraid that I have to skip this invitation and hopefully I can join next year. So sorry Elin..;p
Today's post was all about the "purple sweet potatoes" I got last week. After having a good chat and lunch with my blogger friends at 1U last week, we went to the Cold Storage in the same mall, when we saw these beautiful sweet potatoes, I just can't help myself to grab some. End up I still have alot in my fridge now...haha! Anyway I manage to made 2 recipes out of them..:)

First, the Purple Sweet Potatoes Butter Buns!

The colour somehow faded alittle after baking, but the texture was super soft!
Here's the recipe...
260g Bread flour
5 g milk powder
70g castor sugar
60g egg
40g purple sweet potatoes (cooked and mashed)
150g cold water
6g instant yeast
60g butter
150g raisins

** Alitlle butter, cut into small cubes
** Alittle fine sugar
Method:
~ Combine everything together except butter and raisins into a soft dough, then add in butter to knead until a fine elastic dough at high speed (about 5 minutes with the mixer)
~ Add in raisins and mix well. Covered and let proof for 30 minutes.
~ Divide dough into small oval balls and cut slightly 1-2" in the middle of the buns with a sharp knife.
~ Spread some butter cubes and sugar at the cut areas, and let proof for another 10-15 minutes.
~ Brush the side top with some egg wash and bake at 180'C for 10-12 minutes.

Texture was really good the very day it was baked, somehow it turns alittle hard on the outside the next day. Anyway I have only 2 left overs, and my daughter brought one to school the other day and said it was still good...haha!


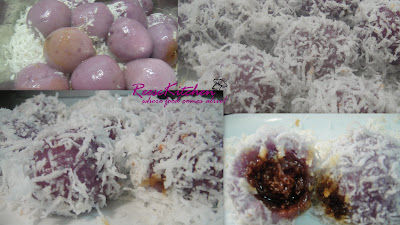
The 2nd recipe was the Ondeh Ondeh. It was one of my older post but only they were "purple". And because they were purple, my hubby and daughter looked like tasting out some new recipe from me...LOL!! And said those were so yummy and gave me all the thumbs up....haha!
Get the recipe by clicking the photo...:)


Have a nice week ahead!!


Tuesday, April 19, 2011

Chocolate Raisins & Nuts Bars

Chocolate Chocolate!! Who doesn't like chocolate? I think there is none right..:) We adults always love chocolates but just because of the word "FAT" then we'll try to eat less..at least I'm one of them..haha!
Okay, today's post a very simple and yet rich with chocolate and nuts bars which my family adores..:D

Chocolate Raisin & Nuts bars!! This recipe has been with me for at least 10 years, and this was only the 3rd time I made...;p Why? You know larr...."fattening" was the fact..LOL!
But this time it was meant for my daughter, anyhow this is her 1st time trying...haha!


Recipe:
250g Granita biscuits (break into bite size)
100g mashmallows (small ones, or halved the normal size)
50g black raisins
50g yogurt raisins
1 cup roasted peanuts
375g good quality dark chocolate ( i used Vahrona Chocolate)
60g shortening

Mehtod:
~ Prepare a tin (6x9") lined with cling wrap. (make sure the cling wrap enough to cover the top)
~ Combine biscuits with marshmallows, raisins, cherries and peanuts. Set aside.
~ Melt chocolate in a pot, when chocolate is totally melted, add in shortening and mix well.
~ Pour melted chocolate mixture into the biscuits mixture and mix well.
~ Cover the top with the rest of the cling wrap and press firmly.
~ Refrigerate until firm. (at least 5-6 hours)
~ Cut into thick slices or squares.

** Chocolate Bars can be store in fridge for a week.


All so crunchy and chocolatety...this is not the usual bars that you can find at the outside store. Believe me, you'll never stop after starting with the first slice...:D


Cho~co~Late~Ty..:)


Sunday, April 17, 2011

Coffee Marble Cake

Lately I was craving for cakes. Wherever I go I'll try to look for special cakes for my tea or supper. *Gosh*...must watch out my diet right!...LOL If you know me well, then you'll ignore me when I said I want a diet..haha! There was once I tried a coffee cake from a hotel, the cake was so moist and soft. And the coffee flavour was what I'm looking for...so yummy! Anyhow, I couldn't get the right touch of the cake after a few attempt. And when I was trying for my 4th attempt last week, I tend to give up for the cake..haha! It was all because the texture of the batter was so weird and watery...my reaction was.."EEEK"!! Well, I did not throw away the coffee batter but used partly of it into my butter cake instead...;p Another version of my butter cake adapted from a bakery nearby my area. Its alittle more creamy and soft than my usual one. And so the idea of the coffee marble came into my mind..:)
Ingredients:

180g fine sugar

250g butter

6 egg yolks

4 egg whites (whisked till soft peak)

250g Plain flour

1 tsp baking powder

250g non dairy cream


Ingredients for coffee paste:

1 tsp good quality coffee powder

1/2 tsp hot water

30g butter batter from the above


Method:

~ Whisked egg whites until soft peak form and set aside.

~ Beat butter and sugar until pale and light, gradually add in egg yolks then follow by the cream.

~ Fold in flour slowly and mix well.

~ Divide egg whites into 3 portions and slowly fold into the egg yolk batter and mix well.

~ Take out 30g from the batter and add in the coffee mixture, stir well.

~ Pour in the butter batter into a 4.5"x9" loaf tin, then pour the coffee batter on top and make a marble effect by using a fork.

~ Bake at 175'C for 45 minutes.


Before I sign off, here's some pictures that I'll like to show you...heehee. (thick skin)..;p

2 cutie sponges that I did for a friend. She actually shared these cakes at her son's kindy last week and she told me the kids love them so much...:D

Recipes and method are the same as the cutie swiss roll I did before. You can have the recipe here..:)


Cheers!!

LinkWithin

Related Posts with Thumbnails