Saturday, October 31, 2009

Happy Halloween

Happy Halloween everyone!
This is the very first time i celebrate Halloween! Only this year i got to know the exact day for Halloween...;p I think its not quite porpular here, in Malaysia. All i know is we got to dress spooky and have lots of sweet treats...haha! And we had a great day celebrating it at our dear friend's house. Lots of sweets, yummy food and desserts! Yum yum..:)

Everyone brought something to the party, as we are having potluck...so i just came up with this silly ideas....;)


Grave Yard Chocolate Mousse


Strawberry Ghost


My very old style Sticky Rice (糯米饭)
All these were brought to my friend's house...together with other delicious food made by my friends, all displayed on the table. All were too good to resist...and now i still need time to digest before i go to bed. Just imagine how much i've eaten...haha!
I really had a great time today, and i hope we'll celebrate this day every year from now. Guess our little girls had fun dressing up and too will look forward to the next Halloween..:)

Wednesday, October 28, 2009

Nyonya Spiral Curry Puff

Hey my dearest reader, as i promised you before that there will be m0re nyonya recipes be posted...;) Of course i'll keep my promise, but sorry for the delay..;p
Now here's one of the recipe from my favourite Nyonya collection, "Curry Puffs".
I enjy most of the curry puffs selling outside, and i always hope to make those myself one day.
Yeah, this was the first time making curry puffs..;p Not bad ha! I'll give myself a thumbs up for this...;=p


There is not much trouble to prepare this puffs but the washing part was..."sigh"..:( By then i'll wish i have a helper..haha! Ok ok, here goes the recipe and method......

Ingredients Pastry:

210g Plain flour

1 Egg

60ml Cold Water

(B)

110g Plain flour

90g Melted margarine

1/4tsp Salt

Ingredients Filling:

(A)

150g Onions (chopped)

80g Shallots (chopped)

1/2 tbsp, each..Curry leaves (shredded) and lime leaves (shredded)

3 tbsps Meat curry powder, mix with 1 tbsp of water into a paste

1 tbsp Chilli paste (optional)

(B)

150g Diced Chicken breast

200g Cooked potatoes (small cubes)

1 tsp Salt

1 tbsp, each..Sugar, cornflour

Method:
~ Making the filling: Fragnant ingredients (A) with some oil, then add in ingredients (B) and stir fry till chicken has cooked. Leve aside to cool.
~ Mix pastry ingredients (A) well and knead into a dough.
~ Mix pastry ingredients (B) well to form the second dough.
~ Wrap dough (B) inside dough (A), as shown in picture below.
~ Flatten and roll out the dough and roll up like a swiss roll, as in picture no.2
~ Turn the rolled dough 90 degrees, and roll out again.
~ Roll up swiss-roll style again, cover the dough and rest for 20 minutes.
~ Divide dough into small portions then flatten it lightly, roll out the dough. After flatten, a spiral will appeared as shown in picture no. 3
~ Wrap up the filling and seal the edge by pinching the edge like picture no. 4
~ Heat up oil and deep-fry to golden brown.


Do remember to place the cooked puffs on a absorbent oil paper to drain away the extra oil.
Its really yummy, and i can easily took 2 right after frying. haha! Opps...got to drink lots of water after eating all these oily frying food, ha!


Somehow, after trying, i find my fillings are not spicy enough. So if you like, do add more chilli paste to spice up. Try it out and let me know how is it..;)


Monday, October 26, 2009

Honey Ma Lai Koh 蜜香马拉糕

These few days have been craving for snacks and kuehs..;p Have been on a strict diet for sometime but guess i couldn't hold it any longer...haha! JUST EAT!!!
"Lives too short for that".....my friend used to tell me..:=) Okay, here i come again.....back to the kitchen and start baking...:)
Already have some recipe planned for this week.....this is the 1st...;p


A very nice recipe from my new book,..actually bought this book quite sometime ago, but never have the time to try it. Why? Read on and you'll know why..;)
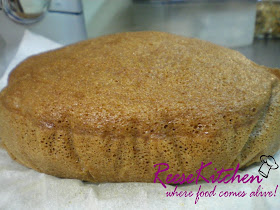
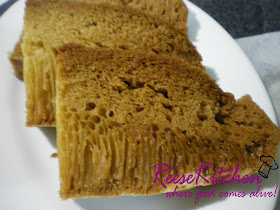
Btw, isn't it looks nice..??


The texture is GOOD!! Alright here's the recipe for you...:)

Ingredients:
(A)
150g Low protein flour
150ml Water
1-1/4tsps Instant yeast

(B)
200g Caster Sugar
1 tbsp Honey
1/4tsp Salt

(C)
7 large eggs
60g Low protein flour
50ml Corn oil

(D)
1 tsp Baking powder
1 tsp Baking soda
2 tsps Water
1/8 tsp Alkaline Water

Method:
~ Combine ingredients (A) in a big bowl. Cover and proof for 6 hours.
~ Place the proofed dough in a mixing bowl, add in ingredients (B) and beat till sugar is dissolved.
~ Add in eggs of ingredients (C) and beat well.
~ Add in flour and oil, continue to beat well. Strain mixture into another clean bowl and proof a second time for 12 hours.
~ Mix baking powder, baking soda and water of ingredients (D) together. Pour into the ready dough.
~ Add in alkaline water, mix well. Pour into a lined 8" basket or lined 8" base tin with perforated holes.
~ Steam over high heat for 35 minutes. Test with a skewer, it should come out clean.
~ Remove the cake from the tin or basket immediately and cool completely on a wire rack.

See, this is why i've been waiting this long to make this cake. All the waiting and waiting and waiting.......But it worth all that, really. You'll love it!!


Saturday, October 24, 2009

Black & White

There is nothing better than a nice warm breakfast every morning to start a day..:) And i guess home cook is the best of all too!
Did my same old stuff again for tomorrow's breakfast but this time i did some 'odd' colour on my buns..haha! Somehow, i should have added more charcoal powder in it to make a darker colour texture..;p


My daughter has been asking for sausages and red bean buns since yesterday. So here is it, my same old recipe with some charcoal powder added into another half portion of the dough.
Just follow the ingredients and method stated, at the end of the procedure, take out half portion of the dough and add about 2 tsps charcoal powder and continue to knead till even.
The more charcoal powder added, the darker colour you get. Then just try to be creative when rolling and wrapping the sausages and other fillings...;)


But what i did here was just the same old patterns..hee hee! Have to learn to be more creative horr....;p Okay, next time try again...


Don't worry about the texture after adding the charcoal powder, it'll still soft and yummy. As i mentioned above, it was only 2 tsps. So not much changes to the texture of the dough. Unless you added more, then adjust with the bread flour used.


Anyway, i find that (darker) black will be nicer, don't you think? Give it a try and let me know how is it..:) Cheers!!


Wednesday, October 21, 2009

Choc Chips Raisin Buns

Today i have a very relax day...wondering in the office, seaching the internet..;p Ha ha! Do not tell my BOSS....tell you what, i can easily take a week off, go home everyday in the afternoon for tea, or can just walk straight to the hair saloon in the morning.....Haha! You must be wondering what kind of job i'm on and who's my boss??? Bet you can guess....
Ok ok enough for these nonsence...;p
Searching the web can get enough information you want. Thanks to the great technology we have now. I've printed quite alot of recipe that i like from the web page, from chinese cruisines to european....and so on. Today, i read one which is quite interesting and easy recipe....chocolate buns...mmm...love chocolate..:) Its interesting cause its ingredients consist shortening!


Somehow, kind of worry what and how the bread will turn out, so i decided to change alittle the ingredients..
Here's my version....

300g Bread flour
5g milk powder
10g Cocoa powder
50g Caster sugar
1/2tsp Salt
30g Egg
180g Cold water
7g Instant yeast
20g Unsalted butter
10g Shortening
100g Raisins
Some white and dark chocolate chips for topping

Method:
~ Combine all the ingredients except butter, shortening and raisins.
~ Knead together until forms a smooth dough (about 5 minutes with a mixer @ high speed)
~ Add in butter and shortening and continue to knead until forms an elastic dough. (about 10 minutes @ high speed). Pull a small piece of the dough, and try to stretch a little until almost see tru without breaking, then the dough is done.
~ Add in raisins and mix well.
~ Leave to rise in a greased bowl for 1 hour.
~ Divide into small portions, about 40g each (the portion can be bigger or smaller as you wish). Let them prove for 10 minutes and roll into balls.
May add alittle chocolate chips in side the small balls while rolling.
~ Arrange in a lightly greased muffin tray and let it prove double in size, about 30 minutes.
~ Brush with egg wash and sprinkle some white and dark chocolate chips on top.
~ Bake at 180'C for 20 minutes. Cool in tray for 5 minutes then transfer to wire rack to cool completely.

** Buns can be arrange into a 8x8" square tin, then the buns will stick to each other after bake.


The texture is super soft. While baking, my whole kitchen smells with chocolate! You'll know its yummy and delicious by just looking at it....;)


The kids really love it. One of my friend's girl did ask me to bake again tomorrow...haha! I'll give this recipe a 5 stars, and its top of my list now..:) Try it and you'll know what i mean...Good-day!

Tuesday, October 20, 2009

Stuffed Gourd

Have been a busy day for me today, rushing here and there with work..:( But time flies when you are really busy, just a glimsp then its already time for me to pick up my girl from school.
Rushed to the fresh market nearby, just to get something for our dinner tonight before going to school, then the traffic was terrible.....GOSH!!

While choosing the vegetables in the market, there were a few gourds laying on the counter...very fresh and nice. Then my mum's recipe came right into my mind...so i just grabbed and paid...;p


This is a very homely dish that my mum used to prepared for us...guess its been along time since i ate this. When i reached home, the very first thing is confirmed the recipe with my mum...:)
Then to the kitchen i go....heehee!

Here's the recipe...

Ingredients:
1 medium size Gourd / Squash
100g minced pork
30-40g Medium size prawns (deshelled, washed and cut into small chunks)
5 shallots (chopped)
5 black mushrooms (soaked, cut into small cubes)
2 tbsps Dried Shrimps (soaked)
1 tsp Garlic (minced)

Marinate sauce:
2 tbsps Soy sauce
2 tsps Sesame sauce
alittle pepper and salt to taste

Seasoning:
1tbsps Oyster sauce
1 tsp Sugar
1/2 bowl water
alittle cornstarch

Method:
~ Marinate the meat, prawns and shallots together for 1 hour.
~ Clean the gourd, peeled off the skin and cut into rings. Remove the seeds in the center of each rings.
~ Stuff the meat mixture in between the rings.
~ Panfry the stuffed gourd rings until both side slightly golden brown, then set aside.
~ In a wok or a claypot, panfry the garlic till fragnant, add in mushrooms and dried shrimps and fry till fragnant.
~ Add in all the seasonings except cornstarch, then add in the rings and bring to boil.
~ Lower the fire and simmer for about 15-20 mins or until the gourds are tender. Serve hot.


Its very delicious and goes well with white rice. It can be done with bitter gourd or any other kind of gourds. I'm sure you'll definetely cook this more than once..:) Enjoy!!

Monday, October 19, 2009

Great Companion....Butter / Choc Cookies

What's the meaning of today's title???...Well, its really great and fun!! That was the most FUN baking and deco section i ever had..hee hee! Okay, okay.....let me tell you ...;)
My daughter wanted to join me whenever i was baking or cooking most of the time. So i promised her that we'll bake some cookies and decorate it. She has been looking forward to her very 1st baking class...haha! Then we've made it today!


Never thought of it was such a fun baking with her. She can handle the tools carefully and properly. And i was so surprised that she had such a patient spending the whole 3 hours in the kitchen with me! Guess we cannot under estimate those kids nowadays..;p
Here are those cookies she decorated.....really great!!

I'ver prepared the dough for her this morning....chilled then let her cut with her favourite cutter. Yeap...she used all her cutter from her play-doh..haha! The ingredients for the cookies?....okay here is it.....
Ingredients (Butter sugar cookies)
230g All purpose flour
1/8tsp Salt
1/2tsp Baking powder
113g Unsalted butter
120g Caster sugar
1 large egg
1 tsp Vanilla essence
* sugar already been reduced
Method:
~ Mix together flour, salt and baking powder. Set aside.
~ In an electric mixer, beat the butter and sugar until light and fluffy (about 3-4 mins)
~Add in egg and vanilla, beat until combined.
~ Add in flour mixture, and beat until become a smooth dough.
~ Divide the dough into 2 portions, wrap with a plastic wrap. Refrigerate for about 1 hour or until fir enough to roll.
~ Preheat oven to 180'C. Remove 1 half of the chilled dough, placed on a lightly flour dust surface and roll out the dough (1cm thickness)
~ Lightly flour the cookies cutter and cut into desire shapes.
~ Placed the cookies on the tray (lined with parchment paper) and chilled for another 10-15 mins.
(this is to prevent the cookies from spreading and losing their shapes while baking)
~ Then bake cookies for 10 mins (depending on the size) or until they turn brown around the edges.
~ Remove from the oven and let cool on baking tray for a few minutes before transfering to a wire rack to cool completely.
(cool completely before frosting or deco)


Ingredients (Chocolate cookies):
190g All purpose flour
65g Unsweetened cocoa powder
4g Baking powder
1/8 tsp Salt
170g Butter
225g Caster sugar
1 large egg
**Method is the same as the butter cookies

We made half portion of each ingredients today and decorated with some fondant icing.....
We had a great time together..baking until decorating...and yes...trying out the cookies...haha!
"Its so yummy" ....that's her comment, eating her own baking, and she's really proud to show to her friends tomorrow in school. Firts of all, she can't wait to show my husband tonight...:)


There's the bears she drew with those edible colour markers (left side), said that's "US" ..;)
We are looking forward to the next baking moment....that will be cupcakes i think....:)
Stay tune!!


Wednesday, October 14, 2009

Chilled Cheese Cakes

Deepavali is coming, and everybody is so excited about this weekends...i'm talking about the long weekend which the schools will be close for 3 days. Wouldn't know about my plan yet, maybe travelling or just back to my hometown...all depends on my husband's schedule.
Anyway, baking is definetely will be on..haha! Want to know what's on my mind...hee hee..:P Stay tune!

By the way, made some chilled cheese cakes for my daughter's teachers for their hardwork tru the year and also not to forget my dear friends around. Bought some new cutter today, which i think will look nice with this cheese cakes...and yes, they did!


All nicely cut and topped with fruit jam....yummy..:)
Actually the recipe is for a 9" loose base pan, somehow it can be any shape as you like....the most important is the taste.
Anyone who's interested........

Base:
150g Digestive biscuits or Marie biscuits (crushed)
100g Butter (melted)

Filling:
(A)
2 egg yolks
150g Sugar
160g Fresh milk

(B)
2.5 tbsps Gelatine
6 tbsps Hot water

(C)
250g Cream Cheese

(D)
250g Double cream ( lightly whipped, set aside)

(E)
1/2 tbsp Lemon juice

Method:
~ Combine the crushed biscuits and melted butter, pour into the 9" loose base pan, press down the crust firmly with the back of a spoon. Store in the freezer before use.

~ Cook (A) with double boiling and set aside. Mix (B) together and pour into (A). Stir and mix well.
~ Beat cream cheese until smooth, then add in (A+B) mixture, then add in (E). Mix well.
~ Add mixture into (D) , stir and mix well.
~ Pour into prepared crumb crust and chill for 2-3 hours until firm.
~ Top with favourite fruit jams or fresh fruits.


I did it with a 10x10" square pan, so its easier for me to cut with those cutter, and those jams i used was blueberry pie filling, strawberry jam, kiwi and mango puree. Some of them were decorated with chocolate chips cause i see its rather bare with just the jam on top.

Yeap, my finishing is abit rough huh.....;p..that's what my sis used to comment..haha! Will try to improve, guess i need more practice. "Practice makes perfect"!!
So don't wait...get started..:) Cheers!


Monday, October 12, 2009

Pumpkin Paos

Pumpkin is a large, pulpy round fruit, having a thick orange-yellow rind and numerous seeds. I like the colour of the flesh too, strong orange that gives all kind of food that original beautiful colour. There are lots of recipes goes with this fruit, such as cakes , pies, kuehs etc, etc...
This round i'm using it for the paos and it turned out just right.


Don't they looked like "Golden eggs"??...:) The colour is so beautiful and the texture is very soft too. Here's the recipe..


Ingredients for the dough:
500g Pao flour
2 tsps Double action baking powder
11g Instant yeast
100g Mashed pumpkins
110g Caster sugar
50g Shortening
160-170ml Water (add slowly into the mixture)

Method for the dough:
~ Mix all ingredients except water in a mixer bowl.
~ At medium speed slowly add in the water to form a smooth dough (might not need that much amount of water, all depends on the pumpkin used)
~ Divide the dough into 3 even portions, flatten each portion and roll up like a swiss roll (2 times)
~ Then cut out into small portions (about 40-50g each) -all depends how big you want the paos to be, as shown below.
~ Flatten each small dough with rolling pin and wrap in filling. Cover with damp cloth until the dough is double in size.
~ Arrange in steamer and steam over high heat for 10 minutes.


Peanuts filling:
* 200-300g Roasted peanuts (grind)
* 3-4 tbsps Caster sugar ( can be reduced if too sweet)
* 2 tbsps Cooking oil
~ Mix all together, set aside.
or
* Some ready made red-bean paste.

When times come for testing, my daughter prefered the peanuts than the red-bean which she used to favour..;p Guess i should make all with peanuts filling next time.


Anyway it can be any filling that you desire. No matter its sweet or salty, all goes well with this pumpkin pastry.


Its as delicious as its without filling. Goes well with homemade kaya or jam. Healthy and delicious...what else can i say..:)


Thursday, October 8, 2009

A Promise

"When you make a promise, you have to do it!" That's what i told my girl all the time.
But i always forgot what i promised her, until she got angry..haha! Guess i'm not a good role model to her....;p
I've promised her that i'll bake something for her school party today, which the school will celebrate the Hari Raya and also the coming Deepavali and Children's day. Already showed me the notice from her school few days ago, and she too already chose her recipe. hee hee..:p
So no matter how lazy i am, i got to do it this time!

Octopus kaya pandan buns
Some pandan kaya bread for her breakfast last two days,.....made into the shape of an "octopus"!
Inspired by the "Cottage Bakery" red-bean buns, which we bought last weekend from my aunt's place. Very cute and my girl love it! Its not the taste of my buns, its the shape of it..haha!
Recipe is from my previous post.


Butterfly cupcakes
Here is it....the cupcakes i promised her for her school party.
Just a simple and easy cupcakes that the kids will like, vanila and chocolate.
The preparation for the batter only takes about 15mins, cooking time about 20 minutes then done. But the cutting and decorating part need alittle longer time, due to the mini cupcakes i made. When my daughter sees those cakes, she was so happy and said she wants to help too. Guess it worth all the trouble seeing her so happy and satisfied..:)


A recipe from one of my collection "Favourite Cupcakes". Here the recipe goes....

Ingredients for Vanilla cupcakes:
3 large eggs
225g butter, softened
1 cup caster sugar
1/2 cup milk
1 + 1/2 cup Self-raising flour
1 tsp vanilla essence

Topping:
1 cup icing sugar
1 tsp vanilla essence
225g butter, room temperature

Deco:
Chocolate chips or coloured sugar sweets or M&Ms

Method:
~ Preheat oven to 180'C
~ Lightly beat the eggs, add in butter and sugar, then mix until light and fluffy.
~ Add milk, flour and vanilla, and beat until light and fluffy about 2 minutes.
~ Spoon into prepared cupcake papers, bake for 18-20 minutes until risen and firm to touch.

Method for topping:
~ Combine all the topping ingredients, beat until light and fluffy.

Deco:
~ Using a sharp knife, slice off the top center of each cake. Cut these circle into half and set aside.
~ Fill the center of each cupcake with icing, and stand the two pieces of cake top upright, to form wings. Slightly pipe alittle in the center of the wings to form the body of the butterfly.
~ Decorate with some chocolate chips or coloured sugar sweets in the center (body).


For those chocolate flavoured ones, just add in 100g dark chocolate pieces or chopped cooking chocolate and 1 tbsp cocoa powder.
The rest of the ingredients and method are the same as the above vanilla cupcakes.


At the end of the day when i pick up my girl from school...she happily told me the cupcakes are all finished. She was so proud that she told her friends she did the decorating..haha!
The cakes are really good for kids party, especially when you make it into small mini sizes. It looks cute..:)


Tuesday, October 6, 2009

Baked Tuna Pasta

These few days has been very lazy...;p After sending my daughter to school, i'll just sit by my laptop playing some games....blah blah blah......that's it! Half a day gone...;p Hee hee! You must have been thinking what on earth s happening to me?? Nothing wrong actually....it was just that my husband is away for his bussiness trip, my dear friend (my baking companion) is away for holiday..;) Guess i have to start baking some bread, cakes and other snacks for my daughter..:) She has been complaining that's nothing for her breakfast and tea...haha! Come on!! Take away those lazy bones and get started!

So then i started with her favourite....Pasta! But with alittle changes....."Baked Pasta".


Its yummy! That's her comment...:)
Another of those recipes that were handed down to me by my friend but i have made changes since then. Anyway if you like more cheesy texture, cheese can be added inside or more on the topping.
Here's the recipe......

250g Pasta or Macaroni
2 tbsps Olive oil
1/2 tsp salt
** Boil together till the pasta or macaroni are cooked. Set aside.

Ingredients for sauce:
1/2 cup butter
1/2 cup Plain flour
1/2 cup Fresh milk
1/2 cup Water
1 small can Tuna flakes in oil (drained)
1 small can (200g) Cream of mushroom
1 small Green Capsicum (chopped)
1 small Red Capsicum (chopped) -I used yellow
Salt and pepper to taste
Mozzarella Cheese for topping

Method:
~ Melt butter and add in flour. Stir well.
~ Add in water, milk and cook till creamy.
~ Add in tuna flakes, then cream of mushroom and capsicums.
~ Add in salt and pepper to taste.
~ Stir in cooked pasta and mix well
~ Pour into a Pyrex dish or any baking tray and topped with mozzarella cheese.
~ Bake at 190-200'C for 10 minutes or till cheese melts. Serve hot.


Mmm....really taste good..:) With those crispy cheese on top and the creamy sauce inside...YUMMY! I think kids like it more this way than the plain old way of creamy sauce pasta.

Its easy to prepare, only needs about 30 minutes. The amount of the ingredients here serves 4 adults, but my daughter took quarter of it...haha!


Try it out then you'll know!...............Enjoy!!

Friday, October 2, 2009

Chendol Agar-Agar

Mid-Autumn Festival or my girl will call it "Lantern Festival" or maybe "Mooncake Festival....is tomorrow. How are we going to celebrate?? Well, its alittle quiet this year, no party..no gathering..no husband around...hahaha! What am i trying to say here....no larr...he's just happened to work during this day.
Anyway i've just planned to go to my aunt's house nearby, have a warm and nice dinner with her, then some cooling dessert under the bright round moon tomorrow....hope there is one! (no rain please...;p) So i've made some agar-agar (jelly) for our dessert tomorrow, hope she'll like it..:)


Some little cute roses and some lettering...hee hee! Just play around with the new cookies cutter, luckily it turns out nicely. The rose? Its the mould i borrowed from my dear friend........


Beautifully done! Don't really want to eat it huh.....i keep looking at them after i took out from the mould, just don't feel like destroy it..haha! Fot the details and recipe of this agar-agar, please proceed to honeybeesweets. To thank her for the recipe and the mould, i've made her some together with her blog's name.....(see below's picture)


Thank you so much of the agar-agar powder and the mould, Bee Bee. Hope you like my "creation"..hee hee...;p


Hey, my friends and fellow out there, please try this out, its really very nice. And i can say its not much trouble preparing...so get started. ^=^ Enjoy!!


Thursday, October 1, 2009

Nyonya Ondeh- Ondeh

Yesterday i've been thinking and searching for some recipe which is light and easy to carry for my husaband's supper while he was at the airport waiting to aboard. *Sigh*..:( ....he's going off for a few days due to his work. Althought its only a few days, but we'll miss him..;p
So, at last i decided to make his favourite kueh to bring along...the "Ondeh-Ondeh".
Its been a long long time i've since made this kueh. Let me see.....i think it was about 20 years ago. No joking larr.....really 20 years!!! That time i was just a teenager, having some cooking fun at my friends house..haha! Wow!! Really a long time ago huh...;p Yes, i still keep the recipe but with some slight changes. (mix and match with the recipe book i have now)....


The result ha.....yea, nice! But the filling inside was not much, due to the wrapping skill...hee hee!
Will make these again in 2 days time for my aunty, who we will celebrate the lantern festival with, coming weekend. So i must make sure the filling inside is full enough this time!

Here's the recipe.....

Ingredients:
(A)
210ml Water
10pcs pounded Pandan leaves

(B)
1 tbsp Tapioca flour
85ml Water

(C)
300g Glutinuos flour
120g mashed Pumpkin / orange sweet potatoes (i used pumpkin here)
1 tbsp Sugar

* 150-200g Palm sugar (grated) - Filling
* 1 Grated coconut - Coating

Method:
~ Bring to boil the (A) and strain. Keep aside
~ Steamed the pumpkin / sweet potatoes for about 5-8 minutes until soft and mashed.
~ Mix well the Glutiniuos rice flour, sugar and mashed pumpkin/ sweet potatoes from ingredients (C)
~ Boil (B), the 85ml water with 1 tbsp tapioca flour over low heat, stirring till almost transparent.
~ Pout the tapioca mixture immediately into (C), stir and mix well while slowly add in the (A) to form a smooth dough. (if the dough is too soft, add in glutinous flour)
~ Bring to boil at least half pot of water, then take a small portion of dough and wrap in the grated palm sugar, seal properly and roll into a ball, and put into the boiling water after wrapped.
~ When the balls surfaces, keep boiling for another 1-2 minutes, remove and roll over the fresh grated coconut, and serve!


The texture is very nice...very "Q" ...as in mandarine....hee hee :) Oh about the colour here, its the original colourfrom the pumpkin. No colour added here! If you like it to be green like the one selling outside, do use the white sweet potatoes to replace the pumpkin, but have to steam alittle longer. Then add a few drops of green colouring. But why not just the original colour from the tasty and fresh pumpkins / orange sweet potatoes?? Try it out!