Wednesday, May 27, 2015

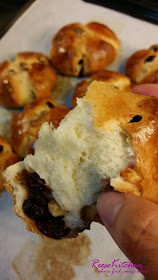
Walnut and Dried Cranberries Milk Buns

Manage to bake some buns today after a not-so-long break...haha! Yeah, kind of lazy since last bakes but I'm back, back to my HQ (my kitchen la...)
I'll like to share this delicious soft buns with you because I find this recipe is rather easy (not to mention the time consuming la) compare with those with starter dough or tang zong. 

Recipe adapted from My Mind Patch Please refer to her blog for reference.
I have been baking this recipe from this blog for quite a lot of times and I love it!! T
This time with the same recipe but I've added some other ingredients into it and made them into a flower shape...hehe! Nice or not?? ^^


After the first proofing, divide the dough into equal portions, place some dried cranberries and toasted walnuts on top

 Roll it up from the inside and pull down the side of the dough and seal at the bottom to make a ball

 After the last proofing cut the edges with a sharp knife, rub some egg wash on top and place a small walnut in the center if you like

 And for my super hot oven, I just bake at 160'C for 20 minutes, and my super soft buns are ready to be eaten!

Please refer to the original author for details, The Mind Patch

Cheers!

Monday, May 18, 2015

Baked Mini Sponge Cakes/Kueh Bahulu (小小鸡蛋糕)

Feeling great when you got things done at the first time. I've wanted to try this cake long time ago but never have the gut to do it until my mom gave me the mold weeks ago. Actually I've bookmarked this recipe from my collection of books long long time ago..haha! Yeah...finally I get to to it. And yay! I've got it right in my first attempt. 
My mom used to make this Mini Sponge Cake / Kueh Bahulu every year for us during Chinese New Year. She has been using many different kinds of recipe (mostly her own recipe..haha!) and sometimes she just couldn't get it right. You know, when she refused to follow the proper recipe and go with her own instinct instead...hmm, I should make this for her to try..;p
All the simple ingredients required (no emulsifier or any artificial ingredients) and you can have some soft and fluffy mini cakes for tea or breakfast. Love it!


Ingredients:
200g cake flour
1 tsp baking powder
300g eggs (without shell)
250g castor sugar
1 tsp pure vanilla essence
50g corn oil

小小鸡蛋糕

Method:
* Dry-fry cake flour in a clean wok till light. (the lighter you feel the better). Cool.
* Sieve cooled flour together with baking powder.
* In an electric mixer beat eggs and sugar till very light and fluffy. Add in vanilla.
* At low speed fold in flour and corn oil alternatively. (starts and ends with dry ingredients)
* Preheat oven at 180'C. Heat and grease molds.
* Spoon in batter into molds (3/4 full) and bake at 180'C for 15 minutes or till golden brown.
* Remove and cool completely before storing in an air tight container.
(use a tooth pick to remove the cakes from the mold if you are using the stainless steel mold like mine)

Did some with small round cake molds (about 2" width) and they look beautiful.
Maybe you can try with other flavors by adding pandan juice or cocoa powder for chocolate lovers. I think I'll try some with coffee next time...hehe!


Have a look in the inside of the cake, does it looks soft to you? Maybe you have a better one...please do share with me ya. Thanks in advance..(^_^)


Happy Baking!!!

Thursday, May 14, 2015

Chinese Style Fried Prawn Pancakes 炸虾饼

This is one of my favourite when I was a kid. I still remember, at that time there was a lady riding her bicycle selling different kinds of kueh. She will stopped by my house for few minutes to sell her delicious kueh. And then, we (my sisters and I) will asked my mom to buy some for us, and this Fried Prawn Pancake was always my order..;p
Now, I still get to buy some when I used to go "Pasar Malam" or the night market.

Well, at last I did try it myself and YES!! They are GOOD, TASTY...YUMMY!!!
Alright...I'm not so sure what's the proper name for this yumilicious kueh. In Mandarin, we used to call it 炸虾饼, where it was so called Fried Prawn Cake/Biscuits (direct translate) Somehow, I find it weird to name it "biscuits" or "cake"...so I just named it "Fried Prawn Pancakes"! 
Anyway, no matter what's the name is, the most important point is...they are DELICIOUS!


Here's my own version of the pancakes, maybe you can share with me if you have a better one...(^_^)

Ingredients:
250g plain flour
1 tbsp blended rice flour
1 tsp salt
1 tsp five spice powder (五香粉)
a little white pepper to taste
1 tbsp cooking
350ml water
a little spring onions (cut into 1" long)
some shredded Jicama (optinal)
15 medium prawns (remove the scales or leave it to whole depends to individual)

Cooking oil for deep fry.


Method:
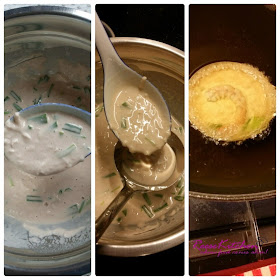
* Mix all ingredients together except the prawns, to form a runny batter (shown above)
* Heat up the oil, preheat a ladle (any size as you desire) in the hot oil.
* When the ladle is hot enough, spoon some batter (filled up half of the ladle) into the ladle and place a prawn on it.
* Soak the ladle into the hot oil where the oil must cover the surface of the kueh.
* After a minute or two, use a small knife or cutter gently scrape the side of the ladle to remove the pancake.
* Let the pancake continue to fry till golden on both sides. Repeat the steps until all the batter has used up.

** Thickness depends to individual. If you like a thinner and crispy one, spoon to fill up 3/4 of the ladle will do.


Love the texture to bits. Crispy outside and soft in the inside. Serve with your favourite chili sauce or just have it plain like that. 


The portion of the ingredients makes 15 (slightly thick ones) I will make this again very soon because I just can't get enough of it...hehe!
Hope you like this too!!!


Cheers!

Sunday, May 10, 2015

Chicken Curry Bread Pot 咖喱面包窝

What a BIG bun huh?!! It is really BIG..haha! (see the 2nd pic) Too big that my hands can't manage to grab the whole bun! Wonder what's inside? Scroll down and you'll see...(^o^)


See how big it is here....Opps! the cracked top..:(( The bread was too soft that I've accidentally cracked it while removing it from the baking pan.


Yeah!! Chicken Curry was hidden inside this BIG bun! (sorry for the bad images here, the light was too dim when I took these pictures)
This is how they served the Chicken Curry with bread back in my hometown.

I'm sorry too that I've forgotten to take some pictures on how I wrapped the Curry Chicken with the bread dough. But it was rather easy, just need to be careful and gently not to tear the bread dough apart.

Recipe and method for the bread,... please refer to honeybeesweets blog.

* Cook the curry chicken with some thick gravy and wrap with an aluminium foil (seal tight)
* Rub some butter on a 10" round cake pan or lined it with a parchment paper.
* Roll out the ready bread dough into a round shape (enough to wrap up the foiled Curry Chicken) with a rolling pin, thickness about 2". Slightly roll a little thinly the sides of the bread dough.
* Place the rolled dough on top of the wrapped Curry and seal at the bottom.
* Place into an 10" round cake pan
* Brush some egg wash on top of the bread (do not skip this because we want the bread top to be a little shinny and crispy)
* Bake at 170'C for 45 minutes
* Once done, cool slightly and remove from the pan and serve.


Recipe for Chicken Curry....please refer to my older post on Steamed Spare-ribs Curry.
Replace the spare ribs with chicken or any other meat. Then reduce the amount of water so that you'll have a thicker gravy for easy wrapping.
* Wrap up the curry with some gravy with aluminium foil, seal tightly to avoid any leaking when baking.


Ta-da...it's time to serve. We had this for dinner last few days, and I'm going to make this again for our coming party end of this month. ^^
This was my first attempt though, and I got it right! Yay!!! And I'm glad everyone loves it..:))


Here are some braided buns with the same bread recipe which I've done earlier. Love the texture, and they were still soft the next day!


Happy Baking!

Thursday, May 7, 2015

Beetroot Cupcakes with Cream Cheese Topping

This is a fine cake that you must try. Highly recommended for the texture and the delicious taste. I never thought they would taste that good because I'm not a fan for beetroot but surprisingly there were good. Trust me, they were really good! Texture were soft and fluffy, goes really well with the cream cheese icing.
By the way I was expecting the outcome will be pinkish red but they were brownish instead, maybe I'll reduce the cocoa powder the next round when I try. 


(Makes 12)
Ingredients:
2 cups cake flour
1 tsp baking powder
1 tsp salt
1 tbsp cocoa powder (has been reduced to maintain the red colour from the beet)
1.5 cups sugar
1 cup corn oil
2 eggs
1/2 cup fresh milk
1 cup beetroot (cooked & blended)
2 tsps vanilla essence
1 tsp white vinegar


Method:
* Preheat oven to 170'C
* Lined paper cups on cupcake mold
* Mix together cake flour, cocoa powder, baking powder and salt in a bowl.
* Whisk sugar and corn oil in a mixer, add in eggs, milk, blended beetroot and vanilla until combined.
* Stir in white vinegar.
* Combine the wet ingredients with the dry ingredients a little at a time until well combined.
* Spoon the batter into prepared cups.
* bake at 170'C for 20-25 minutes. Cool completely before topping with the cream cheese icing.


Cream Cheese Topping:
125g Cream Cheese
60g Butter
60g Icing sugar

* Beat them all together in a mixing bowl until creamy.
* Using a piping bag with a flower nozzle, pipe the icing onto the cooled cupcakes and top with some toasted walnuts if desire.


Cheers!


Monday, May 4, 2015

Nestum Cereal Cookie Bars

Had a nice weekend with family and friends, lots of good food and some shopping too. I love holidays when I don't have to wake up early preparing breakfast, don't have to rush home to prepare meals while shopping..haha! Wish everyday is holiday..;p
Well, even though it's holiday, I still bake a little. Yeah, can't live without going into my kitchen though..(^^)
Here's an easy recipe which I baked last 2 days for my daughter's snacks (she loves snacks). First attempt, and it's not bad at all. 


Recipe:
80g sugar
125g butter
1 egg yolk
2 tbsps fresh milk
100g Nestum honey cereal
100g plain flour
30g cornflour
30g tapioca flour
1/2 tsp baking powder
1 tsp vanilla essence


Method:
* Beat butter and sugar till creamy.
* Add in egg yolk, milk and vanilla.
* Add in Nestum honey cereal and (all) flour.
* Mix well to form a soft dough
* Pour into a 10x10" square pan and press firmly.
* Bake at 170'C for 30 mins or until golden brown.
* Remove from oven and cut into small rectangles with a knife while it's still hot.
* Let cool completely before remove from the pan. Store in an airtight container.


The texture was crispy outside and a little soft in the inside. It's still good until today!
Maybe you can try with some other cereal or oats. I bet it will taste good too.


Cheers!