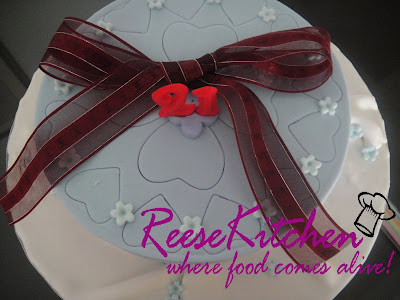
Yesterday was my hubby's niece 21st birthday, and so I'm the one to bake her a cake. Infect she has been asking since a month ago...hehe! I'm so glad to have this opportunity to do so, a chance for me to show off my talent again...LOL!! (really thick skin ).
To bake for a birthday girl (well, a pretty lady now), I have to make sure she likes the flavours and the colours of the cake. She told me she loves chocolates, nuts and berries and most of all must make the cake with her favourite purple colour. It took me awhile to think about the cake for her and I finally found one from my collection of books, Cake Classics. (蛋糕教室)
So here is it...................
 A "box" of Chocolate Berries Cake filled with her favourite chocolates!!! Again I've adapted this idea form another book, Party Cakes by Carol Deacon. Let me share with you the wonderful recipe of the cake first (with some changes)......
(A)
303g butter
180g brown sugar
80g fresh blueberries (whole)
80g fresh strawberries (quartered)
80g black raisins
(B)
377g eggs
(C)
75g cocoa powder
340g cake flour
15g baking powder
(D)
80g ground hazelnuts

~ Beat buter and sugar from (A) until light and fluffy then beat in all berries and raisins.
~ Add in (B) and beat well.
~ Sift (C) and slowly fold into egg and berries mixture and mix well.
~ Lastly fold in (D) and mix well.
~ Pour into two 8" round pan with parchment paper. Slowly smooth the top of the batter with a spatula as the texture is quite sticky.
~ Bake at 180'C for 35 minutes.
 When the cakes were totally cooled, I wrapped them with cling form to prevent dryness. Then I proceed to the decorations. Well, as you can see there were no piping on this cake at all, so I actually did the decorations 2 hours before presenting to the birthday girl..hehe! Except the cover of the cake, which I did 3 days ago.
Prepared a little chocolate butter cream (about 5 tbsps) for staging the cake together and also the side of the cake. Wrapped the cake with fondant and finished the decorations by placing the chocolates on top. Ta-Da...its done!!
 A view of the cake inside, moist and chocolaty. Oh yes, the birthday girl love this and so do all her family and friends. I'm very happy and I had a good time eating at the party too...LOL!!
Happy Birthday Alicia Xuan!!!!

What a lovely idea! I bet any gal would love to have this for their birthday or anytime, heehee! So chocolaty the cake....same as Royden's cake? Happy birthday to Ben's niece!
ReplyDeleteThanks Bee Bee,
ReplyDeleteIts not the same as Royden's. Its another recipe adapted from Cake Classics which I added fresh berries into it..:)
Lovely cake, very creative ideal :)
ReplyDeleteThank you Amelia...:)
ReplyDeletehow to make the side of the cake with fondant?
ReplyDeletelook great..
Hi michellegirl,
ReplyDeleteFirst roll out the fondant to the thickness you prefer ( but note that too thin may not stand) then measure the height & the long (around cake). Then cut out and dust with enough icing sugar or cornflour, then roll it to cover the side of the cake which is already coated with thin layer of cream.
Happy baking!!
i wish you make every step & share with us..
ReplyDeletereally.. nice.. >.<
hope to see your new recipe.. ^^