Tuesday, September 29, 2009

Grilled pork (Char siu) buns / Chicken Curry buns

Buns again! But this time with salty fillings. The result??...Of course very nice!...;p
Wanted to make these quite some time ago, but due to the Raya holiday last week, the plan has been postpone and postpone. Well, i did alittle of baking last few days during the holiday. Yup...those mooncakes for my family, relatives and close friends. Not the classic mooncakes, but the "Shanghai" flaky mooncakes. Photos? Sorry, no photos here cause it was posted quite sometime early this year. Anyway the recipes is from my friend, honeybeesweets. Anyone interested in the mooncakes, can view from her blog.

Okay, back to my buns here..;)
The recipe for the dough is from my previous red bean buns. I used exactly the same amount of ingredients here. For the fillings.. Grilled Pork (Char Siu) was also from my previous post. I just added alittle more water to pan-fry the Char Siu (cut into small chunks) .
The Chicken Curry filling.......


Ingredients (Chicken Curry filling):

1 chicken breast (cut into small chunks)
1 large potato ( cut into small cubes)
5-6 Shallots ( minced)
2-3 Garlic (minced)
1 large Onion ( cut into small cubes)
2 tbsps Meat curry powder
1 tsp Sugar
Alittle salt to taste
3-4 tbsps of water

Method:
* Marinate the chicken with the 2 tbsps of curry powder for about 30 minutes.
* Saute the shallots and garlic with alittle oil until fragnant (alittle brown)
* Add in the onion and potato, continue to stir fry until fragnant, then add in the chicken.
* Mix well, then add in the sugar, salt and water. Continue to stir in medium fire.
(Water can be added if its too dry)
* When the potato turned soft, and the chicken cooked, leave it to cool before wrapping.


A few white sesame and almond flakes to deco on top of the buns, this is to differentiate the buns with different fillings. I took 1 each right after baked...;p Just can't wait to try it out!
Love it!

I made 2 portions of the bread dough today...why? I cannot just eat it by myself ha....hee hee!
Shared some with my dear friends just now. They also like it..:) When someone says good to your creations, that is the most happiest moment...agree?
With some left over dough i have, i made some "original" recipe...Red Bean Buns! Well, that's my daughter's favourite though..:) The Char siu buns is highly recommended here, have a try and let me know!

Friday, September 25, 2009

Bamboo Charcoal Buns

What a try!! Its nice...:)
My dear friend got me a bottle of bamboo charcoal powder from Singapore this afternoon. Thinking to make a bread loaf from her recipe, but i will like to have some filling inside and also i want to finished up the sausages in my freezer. Anyway there were only 4 sausages...haha! So made the rest with pork floss instead.
Anyone who is interested with this recipe, can get it from my dear friend, honeybeesweets.
I followed exactly the ingredients there, but only add alittle more whipped cream into it. (about 130ml)


All black!! haha! Looks abit wierd ha, but its delicious and soft.
Those sausages buns will keep for my daughter and my nieces tomorrow when i get back to my hometown. Wonder what will they say...heehee...;p Will they dare to try....haha, you know kids, they prefered something more colourful!
Well, my daughter already told me the sausages buns look like "mm-mm"....hahaha! Maybe the colour of the sausages at each ends and the black in the middle...haha...so funny!


But the taste is great for this pork floss rolled bread. I just rolled flat the dough, add some pork floss in the middle then rolled up like a swiss roll. Fantastic!!
Thanks to my friend's recipe and thank you again Bee Bee for the trouble to get the powder for me...:)


This the sausages buns...."****"...haha.. Would like to taste it now, but have to keep for the kids tomorrow. Will get a bite from them...hee hee!...^=^

Friday, September 18, 2009

Peanuts and Trotter Stew

Last week, when we visited my inlaws back at our hometown (Seremban), my mother-in-law gave me a big grilled trotter and some grilled pork. Those were so fresh and the skins were so crispy. Cooked some of it last 2 days, but i still have quite alot amount resting in my frezzer.
So here is it.....Trotter Stew with Peanuts. My mother used to cook this quite some time ago, and i remember the sauce and the meat really goes along well with some streamed white rice.
So then, called my mum! Got the recipe and get started.....


Besides the peanuts, mushrooms were added. When stewing this dish, my whole kitchen was filled with the wonderful aroma...:) Already feel hungry.....hee hee!
The amount i cooked is more than enough for my dear friends to try...hope they like it!

Here's the recipe..

1 no (about 1-1.5kg) Front Trotter (i used grilled ones)
10 Black mushrooms (soak with alittle sugar, so it will soften faster)
6-8 cloves Garlic (whole)
1 small bowl of (raw) Peanuts (soak overnight)

Seasoning:
a little light soy sauce
1 tbsp Oyster sauce
1-2 tsps Sugar
a little salt (optional)

1-2 bowl of water
alittle constarch + water ( to thicken the sauce at the end)

Method:
~ Saute the garlic and peanuts for about 5 minutes, then add in the rest of the ingredients.
~ Stir -fry awhile then add in all the seasoning. (the salt may be avoided if its salty enough)
~ Then add in 1 small bowl of water first, bring to boil.
~ Slower the fire and stew for 1-2 hours until te peanuts and meat tender and soft.
( water may need to add again while stewing.)
~ Stir once awhlie every 30 mins of stewing.
~Lastly when its cooked, add some cornstarch to thicken the sauce.


Easy and delicious...:) Do try it out and let me know...Enjoy!

Wednesday, September 16, 2009

Final Attempt.....

Finally finally, finally i got it!! After a few attempts of cracking, i really feel like giving up. I told myself, this will be the last i'm trying....*PHEW*....and got it at last...:)
A recipe from my dear friend honeybeesweets, althought mine is not as nice as hers, but still can eat larr...hee hee! At least my husband and my daughter said good...:)


As you can see from here, i added too much filling into it....haha! Just want to finish up all the floss in my cupboard. Using a 10x14" tray my friend got for me made the rolling easier. And also the all purpose flour to replace the cake flour made the texture softer. I'll make more swiss roll from now on...hee hee..;p


For friends who like to try this pork floss swiss roll, please get the full recipe and method from my friend, honeybeesweets. Her recipe is wonderful.....thanks alot BB for the recipe and also your precious time for showing me the method..:)

Saturday, September 12, 2009

Special treats

Today is a very special night for me and my friends..:) Must be wondering what is so special ha...hee hee! Well, a night out with friends (only ladies) for dinner then drinking...;p Opps! Yea.....really drinking, that we hopped into pubs..haha!
It has been quite a long time i haven't hang around with friends, i mean having fun hanging around at those pubs, have a drink or two, and some ladies chat. It's actually more than 6 years! Everything had changed, our talks are mostly our kids and husbands, rather than fashions and trends. Hmm....wonder what will we talk about in another 5-6 years ha!
Okay okay, let me upload all the photos that we took just now. Especially the food we ate... yummy!


Here's the restaurant we went,......ALEXIS @ Bangsar...


Nice and cosy place to have dinner then followed by dessert. I have been to this restaurant long long time ago, and its still look the same until today....serving the most delicious cake i love...Tiramisu...:)


Started with a refreshing juice, "Rapsberry-cranberry soda" i think...haha! Forgot about what i ordered.

SAUTED BUTTON MUSHROOMS
There are 4 of us, so we ordered 4 different dishes to share. This is "Sauted Button Mushrooms", the creamy thick sauce served with toasted garlic bread.


SARAWAK LAKSA

Then we have the Sarawak Laksa. Hmm...we like this, which the gravy is not too thick, just nice!


VIETNAMESE BEEF NOODLE

Another noodle...but this is a vietnamese style beef noodles, serve with herbs and lime. The meat was tender and soft....... and its a must try. I used to ordered this whenever i was there long time ago. Can't remember exactly how the taste was, but its delicious.
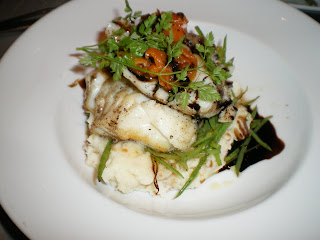
Then here goes our last dish, a western style, very fresh cod fish with baked peaches on top and mashed potatoes underneath.


CANADIAN BAKED COD


And finally our dessert.......the 'Tiramisu' cake i adored...hmmmmmmm..:)


With the crunchy caramel + almond nuts covered the cake...WAH....i'm speechless....just simply love it!

After 2 hours of dinner, we wanted to go somewhere that we can have a drink. First we chose to go to the lounge just right up the restaurant, but at last we went to another pub nearby after taking a few pictures from this lounge...hahaha! The waiter must be wondering what these 4 aunties doing there without ordering then dissapeared...wakakaka!!!
Then we walked down the street to "Finnegan's Irish Pub & Restaurant" which one of my friend recommended. Yea, its more like a pub then the one before.
Here it goes...our Magarita...


then, "Singapore Fling and Mai Tai"...Wooo.....never try these before...


I prefered the "Magarita"..;p The other two were like fruits juice to me..hee hee!
I have a great night out, thank you so much Grace, Bee Bee and S'Hoong...i'll cherish our friendship..:) Looking forward for our other night out soon....;p


~FRIENDS FOREVER~


Thursday, September 10, 2009

Steamed Glutinous Rice with Chicken 糯米鸡

Another glutinous recipe here,...hee hee! Not purposely but just co-incident...:) Never thought of making this rice, but when i was packing my cupboard yesterday, found a packet of this glutinous rice there...hmm,...wonder when i bought this.
Well, since i have to cook dinner tonight, why not just steam some 糯米鸡....;p
Found an easy and fast recipe from one of my collection. So why not just make a few more for my friends too, hope they'll like it...:) The whole portion made only 8 small bowls, and i've added some nice pearl clams to it....hee hee! Nice, nice......


Here is it....yummy! And another of my girl's favourite..haha! After trying a bite, she said...."Okay, nice!" ....Makes me happy!

Here's the recipe:
(Rice)
450g Glutinous rice (rinsed and soak for 3 hours)
1-2 tbsps Oyster sauce
1-2 tbsps Abalone sauce
1 tso Sesame oil
2 tbsps Cooking oil
1 cup Water
Salt and pepper to taste

** Rinsed and drained. Marinate with all other ingredients for at least 30 minutes.


(Filling)
8 Chicken breast or drumsticks (boneless and skinless)-cut into 2" strips
8 Pearl clams (canned)
8 Chinese Sausages
8 Black mushrooms (Soaked, cooked)

(Marinate-chicken)
1 tsp Sugar
1 tbsp Oyster Sauce
1/2 tbsp Thick Soy sauce
1 tbsp Light soy sauce
1 tsp Sesame oil
1 tbsp Cornflour
A dash of pepper
** can add alittle salt to taste

Method:
~ Stir-fry the filling ingredients until half cooked.
~ Greased bowls and place with filling ingredients, then top with the rice.
** Make sure the sauce of the rice is added into it, may see the sauce just covered the rice surface. Otherwise the rice may not cook.
** If the sauce is too little, may add alittle water...but have to taste again and make sure the saltiness is enough.
~ Put the bowls of rice in a steamer and steam until rice is cooked. (about 30 minute at medium heat)
~ Serve with desire chilli sauce.


This is yummy, i can take at least 2 for my dinner....hee hee..:) Its not oily and not so salty....'ngam ngam'...haha!

Tuesday, September 8, 2009

Glutinious Rice balls (loh mei chi) / 红豆黑罗米

Mmm.....sweet sweet dessert! Long for this yummy kueh and the red bean soup for quite some time. Remember when i was a kid, there was an aunty selling all sort of kuehs in front of my house in her bicycle every Sunday morning. Then my dad will give us his order, and we'll queue to buy. I love those days....:)
This is one of the kueh i love, and i still buy it once awhile from the hawker stall or 'pasar malam'.
Never try to make since few years ago after my mum did. Wonder what to do with those peanuts left from the previous 'Sesame Balls' i made last few days. Then i thought of this 'Glutinious Rice Balls' aka 'Loh Mei Chi' in cantonese. So i called up my mum and got the recipe from her. Not very sure where she got this recipe from, but its quite easy to prepare. So i just start up in my kitchen today.;p


Yup! The result is satisfying....:) Everybody loves it! But after biting, it'll left your mouth the white powder...haha!
Here's the recipe....

Ingredients:
(A)
400g Glutinious Rice flour
100g Blended Rice flour
100g Sugar
1 tbsp Cooking oil
600ml Water

(B)
1 cup Blended rice flour (for coating)- Stir-fry only this flour at low heat for 10-15 mins until
light and fluffy. Then keep aside to cool.

Filling....
Toasted groundnuts (grind till fine) and sugar to taste. Mix all together.

Method:
~ Put all ingredients (A) in a big bowl and mix well
~ Sieve the mixture into a greased tray (i used a 9" round tray) and steamed at medium heat for 25 minutes.
~ Cool slightly, spoons out a tbsp full of the sticky paste on to a sheet of non-stick paper or a clean plastic paper. ( i used small thick quality plastic bags)
~ Then used another sheet of the plastic paper or non-stick paper to cover the top and flatten the paste.
~ Remove the top sheet, then spoon in the fillings. Wrap gently until totaly sealed.
** Note that its very sticky, so may use a scraper to help.
~ Coat with the cooked Blended Rice Flour and serve.


This is how i coated the balls with the cooked rice flour. It doesn't matter if the balls are not round in shape. Anyway its quite difficult to make into perfect round shape cause its very very sticky.
**Also note that when wrapping, do not rub the paste or hands with the cooked rice flour, this may cause difficulty on sealling the balls.


**************************************************

And this the red bean soup.....红豆黑罗米......
I added some black glutinious rice into the red bean to have a more smooth texture. When serving, i also added some fresh coconut milk, hmm....this will make the dessert alittle more thicker. What do you think?....hee hee!


The white patch here is the coconut milk i added...:) Look a little weird ha....but taste very good.
The ingredients.....
2 cups of red beans (cleaned and boil with 2 cups of water, then rinse)
1/2 cup of black glutinious rice
5 pandan leaves
600ml of water
~ Bring to boil all ingredients and lower the heat to simmer for an hour.
~ Add in sugar (i used honeycomb sugar) and serve
**Add alittle fresh coconut milk if desire


See the beans and the rice....yummy! Its both delicious whether to serve it hot or cold. I can't wait to have another bowl now. Ha ha! .....Enjoy..:)


Monday, September 7, 2009

Pork Belly in Black Bean Sauce

Besides baking, i have lots of 'hometown' dishes that i'll like to post here, but the probem is i hardly cook....i mean i usually will cook some very simple dishes for my daughter and myself for dinner. My husband..??...he always takes his dinner outside due to his work...hmm...I wish i can cook for him everyday...:( That is why i always look forward to weekends which he can stay home and have my cookings...:) Home cook is always the best, ha! Not to say my cooking is delicious, but at least healthy.
Alright, this is one of my favourite...black bean sauce. I always find that the taste and fragnant of the fermented black beans are so good, and goes along well with alot of ingredients such as pork, chicken or fish.


I remember when i was a kid, my mother cooked this quite often for us. She usually cooked this with pork ribs...mmm...and it taste so good...:)
Today, i made this with pork belly, and no chilli added. Of course it taste better with some chilli, more spice! But because my daughter can't take spicy, i have to avoid it.

Here's the ingredients for the sauce...

5 shallots, peeled and chopped
2 tbsps chopped garlic
1 tbsp chopped ginger
100g fermented black beans, soaked and chopped
Some red chillies or chilli padi, chopped (optional)
A little spring onions, chopped
3 tbsps Cooking oil
80-100ml water

Seasoning:
1tbsp light soy sauce
2 tbsps Oyster sauce
1 tbsp sugar
dash of pepper and sesame oil

Method:
~ Heat up oil and saute chopped shallots, garlic and ginger until fragnant.
~ Add in fermented black beans adn stir-fry till aromatic.
~ Add in chilli if using, spring onions, seasonings and water
~ Mix well and cook at low heat for 3 minutes. Remove from heat.
** This sauce can be refridgerate for a week.


I marinated the pork belly (cubes) for 1-2 hours before steaming. ( Do not add water or oil)
Just steam at high heat for 30 minutes and serve hot. (If using pork ribs, may need to steam for another 15 minutes, until the meat tender.)
It is also very delicious when use for steam fish, chicken claypot or stir-fry crabs...yummy!!

Saturday, September 5, 2009

Gula Melaka Swiss Roll / Plain Loaf

Swiss Roll fewer...hee hee! I remembered i don't really favour swiss roll that much.....but after my friend's influence.....I kind of love ir now!..:)
After knowing the method of making it, I couldn't let it down...hee hee! Keep trying with all kinds of flavours.....;p Pandan, yes, that's common...also tried mango or vanilla too.....what about something different tis time...

Well, 'gula melaka'....it might taste good?!....And "YES"...it really taste good, everybody loves it!
With the same ingredients and method my friend, Bee Bee (honeybeesweets) showed me, but some slight changes here. I would like some thick and strong gravy of coconut in it, which will match the gula melaka i'm going to use. So here it goes.....


Here's the changes i made in the milk and paste or fillings....

50g Corn oil
55g Cake flour
40ml Thick coconut milk
1 tsp Gula melaka (liquid) or melt the gula melaka rock
1 Whole egg
3 Egg whites
3 Egg yolks
85g Castor Sugar
1/8 tsp Salt
1/8 tso Cream of tartar

Method:
~ Preheat oven at 175'C and grease a 10x14" tray with oil, place a sheet of baking paper on the tray then grease one more time on the paper.
~ Whisk egg yolks and sugar (1tbsp from the 85g) until fluffy
~ Add in oil and continue to mix well
~ Then follow by the gula melaka, flour and coconut milk. Whisk till alittle fluffy.
~ In a another bowl, whisk egg whites, cream of tartart and remaining sugar till forms a peak.
~ Divide the egg whites mixture into 3 portions and fold into the egg yolks mixture
(fold slowly until well mix)
~ Pour batter onto the tray and bake at 175'C for 15 minutes and another 5 mins at 160'C
~ Take out from tray after baked, and cool on a wire rack.
~ Cool completely before applying the filling.

Ingredients for the cream (filling):
100g Whipped cream (Whipped will form a peak)
1 or 2 tbsps of gula melaka ( add into the whipped cream and mix well)
** may add more gula melaka if desire
Some shredded coconut for the top of the swiss roll

** For more details of making or rolling the swiss roll, please proceed to my friend's blog, honeybeesweets...:)


****************************************************

Another is my plain loaf....a healthy and yummy breakfast for a Sunday morning..:)
Soft and and delicious with all kinds of spreads. All prepared for my husband with a cup of hot coffee and a cup of warm milk for my daughter when they woke up this morning....what else to say when you have a nice comfortable breakfast to start the day..:) What a good wife and mummy i am...haha...'pai-seh, pai-seh'..;p


Adapted this recipe from my book, "Home Bread"...this is the most simple bread loaf i have, yup! Its easy to prepare, not to mention about the time of wait larr....
If you like this, here's the recipe...
Ingredients:
300g Bread flour
25 g Castor Sugar
5g Salt
5g Dry yeast
190 Cold Water
10g Milk powder
20g Unsalted butter
Method:
~ Mix all ingredients in a mixing bowl except butter
~ Knead until it forms a soft dough
~ Add in butter and continue to knead until it becomes an elastic dough
~ Leave to proof for 90 minutes
~ Divide the dough into 3 portions, flatten the dough and roll like a swiss roll form
~ Place into a greased loaf tin (9x4.5x4.5")
~ Then leave to proof for another 30-40 minutes until its 80% of the tin.
~ Bake at 180'C for 40 minutes
~ Remove from tin after baked and cool on wire rack.
Yummy ! Cheers!

Thursday, September 3, 2009

Sesame Seed Balls (Chien Tui)

Eat, drink and be happy!! Well, it sounds like " what to bother, just EAT first"..haha! Okay okay, in this post, it doesn't look very healthy, but its YUMMY!! hee hee........;p
Yea, all the deep fry, oily and heaty. Nowadays with all not so good environment, we have to be very careful on our food and stay healthy....
But I've been wanting to eat this for quite some time already....hee hee! So i just give it a try larr...Will drink lots of water after that...:)
Yup! First time making this kuih again...alot of first timer ha....;p There are alot of old-time favourite that i wanted to try, so will go one by one every week larr....haha!


Don't they look nice?!....:) I'll call it "Chien Tui" in cantonese....then i just translated it to English with..."Sesame Seed Balls" ...:) Ha ha!
Found this recipe in 2 different books, so i just mix and match with these 2 recipes.....creative ha? Luckily it didn't burst while frying...hahaha!
Here's the ingredients...

(A)
200g Glutinious rice flour
40g Tang flour
1/2 tsp Baking powder
(B)
60g Castor sugar
2 tbsps Cooking oil (i used peanut cooking oil)
150ml Water (might not need that much)

For filling:
1) Ready made red bean paste
2) Groundnuts (toasted and grind) + some castor sugar to taste + some cooking oil. Mix all together until it can forms into a small balls, so that it'll be easier to wrap into the dough later.

For coating : Some white sesame seeds

Method:
~ Mix ingredients (A) together, then make a well in the centre, add in ingredient (B) except water.
~ Keep mixing with one hand and the other pour the water slowly from ingredient (B) until it forms a dough. Rest the dough in a bowl covered with cling wrap for 30 minutes.
** The dough should be alittle soft, not too dry...so that it will not crack when wrapping and frying.
~ Scale the dough into 20g each or any size you desire.
~ Flatten the dough balls and wrap in the fillings. Coat with sesame seeds, press slightly so that the sesame stick properly to the dough.
** May stain dough with a little water if it doesn't stick with the sesame seeds properly.
~ Deep fry for about 5-8 minutes or until golden brown at medium heat.
** Note that if the balls are smaller, it might not need that much time of frying.
~ Remove onto absorbent papers and cool.


This is how the groundnut paste looks like. Its much easier to wrap when its round up into a ball.
For the red bean paste, i just simply spoons into the dough, cause its sticky enough and not so messy when compare to groundnuts.

I didn't stain the balls with water here. Guess my dough is soft enough to stick the sesame after all.


Drop a little red colour to different shape the balls with red beans and groundnuts.


Hmm....all done! Those with groundnuts are more on demand than the red beans...heehee! Luckily i've made enough with groundnuts here..:) Really delicious, crispy outside, sticky and soft inside...yum yum!
More traditional kueh coming up soon....stay tune!!


Tuesday, September 1, 2009

Bread fewer........

Last week, i got a very good book recommended by a dear friend. "Meng lao shi"...a book from Taiwan. My mandarin is terrible larr, don't know how to write..;p
Well, this is one of the recipe in this book...."Super Soft Loaf".
Its really super super soft....nice! If you've been following my work here, you'll know that this is the 2nd time baking a bread loaf. Very nervous again!! haha!
Nervous throughout the whole process....heehee! Luckily it's successful..."phew"!


Kind of like the 'skin' here, crispy....and yet super soft inside...yummy! I'll just post the ingredients here for those who like it, and don't know which book i'm talking about..haha! Especially my 'gang' (all my old buddies), who hardly cook but did baking lately....bravo!!


For those ingredients for sausages and red bean buns are from my previous post.
Here's the ingredients for the Super Soft Loaf...

(A)
1 Egg yolk
10g Castor sugar
15g Bread flour
65g Fresh milk

(B)
250g Bread flour
30g Castor sugar
15g Milk powder
4g Instant yeast
1/2 tsp Salt
100g Water

(C)
25g Unsalted butter

Method:
~ Whisk all ingredients (A) together until well mix, then cook under low fire (continue stirring) until mixture become thick and sticky. (like custard).
~ Pour mixture into a bowl, cool slightly and wrap with cling foil and chill for an hour.
~ Mix all ingredients (B) with the (chilled)-(A) in the mixer bowl, and knead till a dough form
~ Add in (C) and continue to knead on high speed till form an elastic dough. (about 10 minutes)
~ Let proof in an airtight container for 90 minutes.
~ Take out dough and divide into 3 portions (or 2 portions, as your wish). Roll into balls and let rest for 15 minutes.
~ Roll flat each dough with a rolling pin, and slightly roll up each like a swiss roll.
~ Place each rolled dough in a greased loaf tin. (i used 9"x4.5"x4.5" loaf tin)
~ Let proof for another 60 minutes
~ Egg wash the top then bake at 180'C for 30 minutes.
~ Take out loaf and cool on wire rack.


Yummy yummy! All the breads already half gone! hee hee!.........:)
So glad that everybody loves it! My daughter already packed some herself to bring to school tomorrow...haha! She has been asking for more breads for the next few days...really loves bread.....and she's my NO.1 fan!!!...hee hee...:)


LinkWithin

Related Posts with Thumbnails