Sunday, August 21, 2011

Chocolate Chips with Digestive Biscuits Butter Cake

I usually bake at night so that we'll have some fresh bakes the next morning for breakfast. Without any hesitation, I baked some cakes for my daughter's breakfast and her tea break in school. It was suppose to be some chocolate cake but she requested butter cake. Funny, this time she said no chocolate...haha! Anyway I added some chocolate chips into the cake, taste better...:)

The texture is soft and crispy outside but alittle oily due to the digestive biscuits and butter added. Overall I think the kids will love it with the special shape of the cake...:) I've bought this cute silicon mould few weeks back and have been wanted to try it since then. Well, it did not came out as what I expected. I'll try with some other recipes again or maybe some cream piping to make it more tempting next time.

Recipe adapted from "I love butter cake by Kevin Chai".

150g butter
140g sugar (reduced)
3 eggs
50g digestive biscuits (blended)
100g cake flour
1/2 tsp baking powder
100g milk chocolate chips

Method:
~ Grease baking pan or any mould you'll like to use with alittle butter. Preheat oven to 180'C.
~ Beat butter and sugar till light and fluffy.
~ Add in eggs one at a time.
~ Fold in blended biscuits, flour, baking powder and chocolate chips.
~ Mix until well blended and spoon into prepared moulds or pan and bake for 25-30 minutes or until cooked at 180'C.

Cheers!!!

Tuesday, August 16, 2011

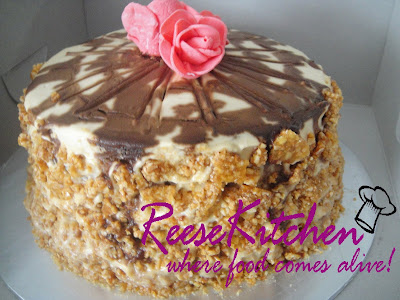
Special Tiramisu Cake

Yesterday was a super great day for me. We went celebrate a friend's birthday at the karaoke nearby and we sang and sang for 4 hours....LOL!! So much fun, that time passed really fast!
Actually we had an early celebration with her, which supposed today is her exact day. Hopefully she has a great time, and there are more birthdays coming soon. Oh, I can't wait for the rest to come...;p
As usual, I volunteered to bake the birthday lady a cake. As her husband suggested a tiramisu, so it solve my problem to search and think what cake to bake. So tiramisu is it!!

This friend of mine love roses so much. So at the last minute, I just made 3 small roses with fondant to deco the top. She actually ate the rose..haha! Oh dear, that was too sweet for her...;p I wanted to make this cake alittle special, so I decorated it differently where usually tiramisu dont't serve that way. See below for the arrangement for the sponge cake.

Recipe for the sponge (8" round pan):
(Chocolate)
3 egg yolks
10g sugar
40g milk
23g corn oil
50g cake flour
10g corn flour
2 tbsps cocoa powder
3 egg whites
30g sugar

3 egg yolks
10g sugar
40g milk
23g corn oil
50g cake flour
10g corn flour
2 tbsps ground hazelnut
3 egg whites
30g sugar

Method:
~ Beat egg yolks and 10g sugar till well mix, then add in oil and milk. Stir well.
~ Add in flour mixture then cocoa powder and mix well. Set aside.
~ Whisk egg whites with 30g sugar till soft peak forms.
~ Fold into egg yolk batter slowly and pour into 7" round pan (with parchment paper).
~ Bake at 180'C preheated oven for 20 minutes or till cook.
~ Remove from pan immediately and let cool.

** Do the same for the Hazelnut sponge.
** Then cut and arranged like the above pictures.

Recipe for the cream:
1/2 cup double cream (whipped)
250g cream cheese
250g mascarpone cheese
60g sugar
2 egg yolks
2-3 tsps coffee paste
1 tbsp Rum

~ Cream both cheeses first then add the rest of the ingredients and beat until well mix. Then the cream is ready to use.
~ Spread the cream on each layer of the cake.
~ Lastly spread the cheese cream all over the cake and drip some coffee paste on top of the cake and make some swirl pattern.
~ Chill the cake at least 4 hours before serving.

** For the almond Caramel, you can refer to my older post here.


Happy Birthday Friend!!!

Friday, August 12, 2011

A Nice Gathering with Good friends & Good Food

Yesterday I had a great day chatting and drinking at friends's house until late night. My daughter had a great time playing with her friends too. We started our small gathering cum party at 7pm but it ends at 130am...haha! What a good night for all of us...:) All of us got abit dizzy after so many bottles of red wine ( can't remember how many ) and talked all sorts of things and really got a good good good laugh! I'm so looking forward to our next meet up...:)

Well, gathering means we have to have nice food and desserts. So I've prepared 2 snacks to go with our wine and a dessert for the kids to enjoy. Oh and not to miss the "Assam Laksa" by my friend, its really a good one but....opps! Forgot to take the picture..;p Beside the laksa, she prepared a nice yummy "Penang Popiah" for us...(you can see the picture below).

Alright, what I've prepared.....1st, "Rosted Pork" . Recipe here.
Then a new dish (my first attempt)..."Assorted Taufu Peanuts Snacks".


For the Taufu Peanut snacks, ingredients and method is really easy and its a best appetizer ever. See the ingredients below....

1) 2 fried taufu (cut into cubes)
2) 4 green chilies (cut into cubes)
3) 1 onion (shredded)
4) 50g peanuts (deep fried)
5) 50g anchovy (deep fried)
6) 1 tbsp Chili bean sauce (辣豆瓣酱)
7) 1-2 tbsps sugar to taste
8) 1 tbsp cooking oil

Pan fry onion and green chilies until fragnant, then add in all other ingredients and pan fry at medium heat until well mix and cook. Dish up, you'll have a good nice dish.

Both were so good, and all my friends love them so much. These were really a good dish or appetizer for any party.


Then not to forget about my specialty...haha! The cutie swiss roll again. This time instead of strawberry, I just filled it with some fresh cream + shredded chocolate. Well, don't kids just love chocolate? Yup, these rolls were gone too in a minute!!
Method was exactly the same as the other rolls I've done before but I just decorate it in another way buy cutting, place flat on a cake sheet and deco with some chocolate chips.
(Refer for the details here)

Lastly but not least, the yummilicious Penang Popiah prepared by the host. So delicious, and everyone can't resist to have few rolls!! Eh...I don't have the recipe yet, but I'll be going to learn it from her soon...:)


Cheers!!


Tuesday, August 9, 2011

Yogurt Garlic Buns & Cutie Rolls

Finally I've the chance to bake this garlic buns. This recipe has been with me for few weeks, and there is always some excuse for me to drag it until yesterday. A recipe I got from a magazine weeks ago, "Famous Cuisine", it looks simple and thought to make it for breakfast since then..;p
All the recipes in it was talking about yogurt. Actually this was the 2nd recipe I've tried. The 1st was the blueberry yogurt tarts, and it turns out really good. So I guess this buns will not fail me though. And yes, the result was good!!


Alright, this was Yogurt Garlic buns! I'm quite picky when it comes to garlic, I don't like raw garlic, I don't like it when its cooked either..;p But I love garlic breads..haha! Weird huh...well, guess it comes from my family gene...LOL. One of my cousin doesn't like prawns but love prawn crackers!!! Okay back to this recipe, the ingredients are simple, maybe you'll have all of them in your fridge now. Let's see.........

Ingredients (A) for Sponge Dough:
120g bread flour
40g plain yogurt
50ml fresh milk
2g instant yeast

Ingredients (B):
250g bread flour
25g sugar
4g instant yeast
80g plain yogurt
100ml fresh milk
20g garlic powder (original called for fresh chopped garlic)
50g butter

**1 egg (beaten for egg wash)
** Some cheddar cheese (for topping)

~ Note if you are using fresh garlic, please remember to add 6g of salt into ingredient (B).


Method:
~ Mix all ingredients (A) for sponge dough in a mixer until forms a dough. Leave to ferment for 2 hours.
~ Place sponge dough and all the ingredients (B) except butter in a mixer and beat until dough forms and add in butter. Beat until an elastic dough forms.
~ Divide dough into 80g each or any sizes you desire into oval shape.
~ Leave them into warm place to proof for further 1 hour or until double in sizes.
~ Egg wash each buns and sprinkle with some cheddar cheese on top.
~ Use a sharp knife and cut off a trace on the surface.
~ Bake in preheated oven at 190'C for 12-15 minutes.

It was really soft and fluffy when its fresh from the oven and the other day too. It was even better when I toasted it back the next day and spread some butter on it. Definitely a keeper for me.
Oh..here's some pictures I'll like to share or you can say...I'm showing off here...haha!
I was helping a friend to bake some Strawberry Swiss Rolls the other day for her staffs. She didn't request any patterns or design to be on the rolls, but I know she love the strawberries pattern that I made for her long ago. So I just did some here..:)


The rolls are not that perfect anyway, somehow there were some cracks here and there. I was not quite happy with my work that day, but my friend was so pleased and was so happy when I passed them to her. I'll do better the next time..;p


Cheers!!

Friday, August 5, 2011

Steamed Chicken in Lotus Leaf (荷香盐蒸鸡)

Its Friday! Can't wait for our weekend activities again...:) What are you going to do this weekend? We have not much to do, as usual to the park and shopping but spending the weekend with the family is the best!!

Today's dinner...steamed chicken. Since I have lots of lotus leaves left, so I decided to use it for today's dish. Recipe was adapted from my latest book collection, "Flavours From My Kampung" (小城滋味多) by Bryan Ong.

Ingredients:
1/2 chicken
2 slice angelica (dang gui)
1 tbsp chinese wolfberry (qi zi)
8 red dates
1 tbsp shredded ginger

Seasoning:
1 tsp salt
1 tbsp light soy sauce
1 tsp sesame oil
2 tbsps shaoxing wine

1 piece dried lotus leaf, blanced till soft in hot water and drained.
1 piece aluminium foil


~ Marinated the chicken with all the ingredients and seasoning for at least 30 minutes.
~ Place lotus leaf onto aluminium foil, put marinated chicken onto the leaf (as shown above) and wrap tight.
~ Wrap the aluminium foil tightly as shown below and place on a steaming plate.
~ Steam over hight heat for 45 minutes. Serve hot.


This dish is so good to go with a bowl of hot steamed white rice...yummy! Try it out then you'll know what I'm trying o tell you.


Have a nice Weekend!!!

Wednesday, August 3, 2011

Black Sesame Steamed Buns / Paus (黑之麻包)

Its August and most of the parents are quite busy with their kids preparing for their 3rd term examinations. But not me!! I'm still so relax and enjoying my time because my daughter has no exam this term. Is it good or bad? I think its bad and I think most of the parents who has their kids in Pre1 will think that. The syllabus for this year's Pre1 has been adjusted and it has becomes more simple instead. Just imagine, my daughter came home from school and told me.."mummy, I like this school so much because I don't have to do any homework!!" I was like..."oh dear". Those kids nowadays are so smart and bright, with this changes, I think they'll get lazy instead. We parents got to do something!!

Oh well, back to my purpose here..hehe! My post today is Steamed Buns/ Paus . My mum gave me a box of red beans paste last weekend which was made by her. I always like her red beans paste, not so sweet and oily but just nice for my buns.

Then I've adapted a new found recipe of steamed buns. Its super soft and fluffy. Trust me, its really good!


Instead of plain ones, I've added some black sesame into the dough. Oh I love the aroma of the black sesame, and it matches the paste so well..:) But my hubby's reaction was like...."Eeee, they look so dirty"!!!...LOL Anyway he still eat without complain..haha!

Okay, recipe ......adapted from the book Don Yong~ Celebrity Chef Cookbooks

150g Pao flour (low gluten flour)
150g plain flour
15g double baking powder
8g black sesame powder
9g instant yeast
80g sugar
150g cold water
30g shortening
350g red bean paste (might not need that much)


Method:
~ Mix all dry ingredients together in a mixer with a dough hook at low speed until well blended.
~ Add in water slowly until dough forms. Mix at low speed for about 2 minutes.
~ Add in shortening and mix on medium speed for about 6 minutes until dough is half developed.
~ Transfer dough onto a flour-dusted work surface and round up. Cover and leave to proof for 45 minutes. (texture after 45 mins was like the picture shown above)
~ Roll out dough and fold into half and roll again, repeat this 6-8 times until the dough is smooth.
~ Leave dough for 15 mins and divide into 30g or 40g pieces. (depends individual)
~ Round up and leave dough pieces for another 10 mins.
~ Roll out each piece of dough and wrap in fillings.
~ Sealed tight and place on a baking paper.
~ Arrange the buns in a steamer at least 2cm apart and prove for 30 minutes.
~ Steam on high heat for 12-15 mins.


Well, this recipe is easy and takes a short time to prepare compared to the last one I did. I like all the recipes I tried, and I'll continue looking for more steaming buns recipe.
Have a peep at the texture below....nice!

The portion of this recipe yells 15 medium ones. I should try this dough again soon for some other fillings before I find another new one...;p Hope you guys like this and do let me know how you find this recipe..:)

Cheers!!


Monday, August 1, 2011

Berries Chocolate Mud Cake

Yesterday was my hubby's niece 21st birthday, and so I'm the one to bake her a cake. Infect she has been asking since a month ago...hehe! I'm so glad to have this opportunity to do so, a chance for me to show off my talent again...LOL!! (really thick skin ).
To bake for a birthday girl (well, a pretty lady now), I have to make sure she likes the flavours and the colours of the cake. She told me she loves chocolates, nuts and berries and most of all must make the cake with her favourite purple colour. It took me awhile to think about the cake for her and I finally found one from my collection of books, Cake Classics. (蛋糕教室)

So here is it...................

A "box" of Chocolate Berries Cake filled with her favourite chocolates!!! Again I've adapted this idea form another book, Party Cakes by Carol Deacon. Let me share with you the wonderful recipe of the cake first (with some changes)......

(A)
303g butter
180g brown sugar
80g fresh blueberries (whole)
80g fresh strawberries (quartered)
80g black raisins

(B)
377g eggs

(C)
75g cocoa powder
340g cake flour
15g baking powder

(D)
80g ground hazelnuts

~ Beat buter and sugar from (A) until light and fluffy then beat in all berries and raisins.
~ Add in (B) and beat well.
~ Sift (C) and slowly fold into egg and berries mixture and mix well.
~ Lastly fold in (D) and mix well.
~ Pour into two 8" round pan with parchment paper. Slowly smooth the top of the batter with a spatula as the texture is quite sticky.
~ Bake at 180'C for 35 minutes.

When the cakes were totally cooled, I wrapped them with cling form to prevent dryness. Then I proceed to the decorations. Well, as you can see there were no piping on this cake at all, so I actually did the decorations 2 hours before presenting to the birthday girl..hehe! Except the cover of the cake, which I did 3 days ago.
Prepared a little chocolate butter cream (about 5 tbsps) for staging the cake together and also the side of the cake. Wrapped the cake with fondant and finished the decorations by placing the chocolates on top. Ta-Da...its done!!

A view of the cake inside, moist and chocolaty. Oh yes, the birthday girl love this and so do all her family and friends. I'm very happy and I had a good time eating at the party too...LOL!!


Happy Birthday Alicia Xuan!!!!


LinkWithin

Related Posts with Thumbnails