Showing posts sorted by date for query rice. Sort by relevance Show all posts

Thursday, May 14, 2015

Chinese Style Fried Prawn Pancakes 炸虾饼

This is one of my favourite when I was a kid. I still remember, at that time there was a lady riding her bicycle selling different kinds of kueh. She will stopped by my house for few minutes to sell her delicious kueh. And then, we (my sisters and I) will asked my mom to buy some for us, and this Fried Prawn Pancake was always my order..;p
Now, I still get to buy some when I used to go "Pasar Malam" or the night market.

Well, at last I did try it myself and YES!! They are GOOD, TASTY...YUMMY!!!
Alright...I'm not so sure what's the proper name for this yumilicious kueh. In Mandarin, we used to call it 炸虾饼, where it was so called Fried Prawn Cake/Biscuits (direct translate) Somehow, I find it weird to name it "biscuits" or "cake"...so I just named it "Fried Prawn Pancakes"! 
Anyway, no matter what's the name is, the most important point is...they are DELICIOUS!


Here's my own version of the pancakes, maybe you can share with me if you have a better one...(^_^)

Ingredients:
250g plain flour
1 tbsp blended rice flour
1 tsp salt
1 tsp five spice powder (五香粉)
a little white pepper to taste
1 tbsp cooking
350ml water
a little spring onions (cut into 1" long)
some shredded Jicama (optinal)
15 medium prawns (remove the scales or leave it to whole depends to individual)

Cooking oil for deep fry.


Method:
* Mix all ingredients together except the prawns, to form a runny batter (shown above)
* Heat up the oil, preheat a ladle (any size as you desire) in the hot oil.
* When the ladle is hot enough, spoon some batter (filled up half of the ladle) into the ladle and place a prawn on it.
* Soak the ladle into the hot oil where the oil must cover the surface of the kueh.
* After a minute or two, use a small knife or cutter gently scrape the side of the ladle to remove the pancake.
* Let the pancake continue to fry till golden on both sides. Repeat the steps until all the batter has used up.

** Thickness depends to individual. If you like a thinner and crispy one, spoon to fill up 3/4 of the ladle will do.


Love the texture to bits. Crispy outside and soft in the inside. Serve with your favourite chili sauce or just have it plain like that. 


The portion of the ingredients makes 15 (slightly thick ones) I will make this again very soon because I just can't get enough of it...hehe!
Hope you like this too!!!


Cheers!

Friday, April 24, 2015

Preserved Meat Claypot Rice 腊味煲仔饭

Having this Claypot Rice the other day for dinner and it was all thumbs up! First time cooking this and find it I will cook this more often because I love it so much..haha! Quite an easy one, all you have to do is to get all the ingredients prepared and cook with a rice cooker or in a claypot over the stove.
Preserved Meat Claypot are Guangdong specialty snack. Love the aroma of the dish while cooking where the rice will absorbed all the flavors of the preserved meat. Somehow cooking with a claypot need a little skill by controlling the heat, example too fierce fire will burn the claypot. I still need practice on that..;p


Ingredients to prepare:
100g Thai rice (soaked for 2 hours)
1 tsp cooking oil
1 preserved duck / wax meat (cut in small pieces)
1 chinese sausages (cut into thin slices)
1 liver sausages (cut into thin slices)
 * some greens for decoration

~ Cook the rice with enough water. (as usually when you cook the white plain rice)
~ When the rice is cooked, use a fork or chopsticks to loosed the rice
~ Display all the other ingredients (except the greens) on top of the rice
~ Drizzle 2 tbsps of seasoning sauce over it and cover the lid
~ Continue to cook / simmer for another 15-20 minutes.
~ Serve with the greens you prepared.

** The amount of the ingredients are depends to individual.


Seasoning sauce:
100ml water
4 tsps soy sauce
1 tsp oyster sauce
1/4 tsp chicken stock powder
1/2 tsp sugar

~ Mix all the above and bring it to boil. Set aside.


If you find it's too dry while serving, drizzle more sauce onto the rice if you prefer.
I will be cooking this real soon, even though I know eating all these preserved food are not so healthy..;p No harm for one more time ha!!! Just Love it!


Happy Eating...^^" 

Saturday, April 11, 2015

Grilled Stuffed Squids served with Aglio Olio Linguine

I always have difficulties when comes to think what should I cook for dinner. My mind will be blank and I will keep staring at the stuffs I have in my fridge or I will go round and round the market hopefully I can get something that my whole family will like. And these were what I got from the market in less than 30 minutes...small fresh prawns, squids, fish, meat, few kinds of vegetables etc. Oh yes, I grabbed almost everything...LOL!!!
So then, here came something different for dinner last night! "At least it's not rice again" ...that's what my little girl commented..:p


Saw this (kind of) recipe on a TV series, and I was, okay..I'll make that! Well, not bad at all, they were all been walloped up! It's alittle messy when comes to clean up the squids, you know the kind of gooey and slippery all over the hands....but I enjoy rubbing them though...haha!


These are what you have to prepare....(enough for 4 persons)

(A) 8 medium squids (cleaned and remove skin, rubbed with little sea salt)
(B) 500g minced pork / chicken
      200g shrimps (shell removed~cut into small pieces)
(C) 200g Linguine
(D) 2 tbsps minced garlic
      a bowl of brocolli (cut)
      1 medium carrot (cut into small cubes)
      2 tbsps dried basil leaves
   a little black pepper & salt to taste
      3 tbsps olive oil

Marinate (B) for at least 2 hours with:
1 tbsp A1 sauce
1 tbsp Lea & Perrins sauce
2 tsps black pepper
1 tsp paprika powder
a little salt & sugar

Prepare some sauce for the grilled squids with:
2 tbsps A1 sauce
1 tbsp Lea & Perrin sauce
a little black pepper and sugar
~ mix well and put in microwave for 1 minute.
     

* When everything are nicely prepared, stuffed the squids with (B).
* Preheat oven at 225'C Rub a little olive oil on the stuffed squids and grill for 15 minutes until both sides turn yellowish. Dish up and cut into small ring size. (shown above)
* Bring the brocolli to boil and drain, keep aside.
* Saute the minced garlic till fragnant, add in carrots and stir fry for 5 minutes then add in brocolli and the rest of the ingredients from (D). Add alittle water if it's too dry. 
* Bring to boil a pot of water and cook the Linguine in 11-12 minutes until its totally softened. Drained.
* Mix in the cooked Linguine with the prepared vegetables and serve on a plate.
* Decorate (as you desire) the grilled stuffed squids on the plate and drizzle with some sauce.

Dinner is served!!!
It was so yummy and I regret I didn't cooked more..^^


Happy Cooking!!!

Thursday, March 5, 2015

Sticky Rice (糯米饭)

On the fifteen day of the Chines New Year, Chap Goh Mei and also known as Chinese Valentine's Day, attracts singletons who throw oranges into the sea in hopes of finding their true soul mates. Anyway, I have never done it...haha! What about you??...^^"
We just used to cooked our favourite food and celebrate!!
What are you cooking today for the celebration? In our Chinese tradition, we used to eat the sticky rice ball (tang yuan) on this day but I've forgotten bout that and replaced it with this Sticky Rice instead.
One of my mom's recipe which I love so much!


Ingredients:
300g Glutinious rice (soaked for 1-2 hours and drained)
10 shallots (diced)
2 stalks chinese sausages (lap-cheong) (cut into small pieces)
6 chinese mushrooms (soaked, diced)
50g dried shrimps (soaked)
3 pieces dried beancurd (diced)
100ml water (may need more or less to just enough to cover the rice)
** rosted peanuts (garnished)

Seasoning:
1 tbsp oyster sauce
1 tbsps chicken stalk powder
little sugar and salt to taste
2 tsps light soy sauce
1 tbsp dark soy sauce

***Ingredients & seasoning are up to individual whether you prefer a stronger taste of mushrooms or chinese sausages.

Method:
~ Saute the shallots until fragnant then add in all the other ingredients (except the rice) and stir fry for awhile.
~ Add in the rice and seasoning and mix well under medium heat.
~ Add in 100ml water and mix well.
~ Transfer the rice into a round pan and steam at medium heat for 30 minutes.
** check if the rice are not well cook, may add alittle more water into the rice and continue to steam
~ Dish up and add some roasted peanuts and serve!!


What's more?! It's more than to serve my whole family as they love this dish so much!
This will only takes you 30 miutes to prepare and another 30 minutes to steam...easy and delicious.


Happy Chap Goh Mei!!

Thursday, January 29, 2015

Simmer-fried Stuffed Hairy Marrow (红烧酿毛瓜)

It seems I didn't have much savory dish posted in my blog. I've tasted this dish since I was a small girl cooked by my grandmother, then by my mother. Now it's my turn, and I'll like to share it with you. 
Not much ingredients to prepare and it only takes about 20 minutes to cook. I never thought that my little girl loves it so much until she walloped the whole bowl of rice with only this dish!


Hairy marrow or fuzzy melon or even sometimes it's been called hairy cucumber looks like a fat cucumber with tiny little hair on the skin. It's quite popular in the Chinese cuisine especially in Cantonese dishes.
 Ingredients:
2x400g Hairy marrow (remove skin, cut into rings about 1.5" thick, remove the seeds)
2 tbsps dried shrimps
4 Chinese mushrooms (soaked till soft, cut into small cubes)
1 tbsp garlic (diced)

Mixed together:
500g minced pork
2 tbsps flounder fish powder
2 tsps cornflour
2 tsps sesame oil
alittle pepper
2 tbsps soy sauce
alittle sugar

300ml chicken stock
3 tbsps cornstarch


 Method:
~ Marinated the minced pork with the seasoning above for at least 30 minutes
~ Cleaned and removed the skin of the melon, cut into rings about 1.5" thick and removed the seeds
~ Stuffed the meat into the melons hole (shown above)
~ Heat up some oil then panfry the stuffed melon till half cooked. (both sides till brown)
~ Stir fry the garlic, dried shrimps and mushrooms till fragrant then add in the chicken stocks
~ When the stock begins to boil, put in the stuffed melons and cover the lid
~ Simmer at low heat for 20 minutes
~ Add in the cornstarch and bring to boil. Dish up!


Cheers!

Sunday, June 24, 2012

Glutinous Rice Rolls


Hi my dear readers and friends..I'm back!...LOL!! I've been missing for such a long time, and yeah..I've left my kitchen to dust!!!....;p
I'm very lazy...really lazy for doing anything. I'm still in the mood of holidaying...GOSH!! Got to wake up huh!
School has starts, back to my daily routine and yet not much cooking and baking except a simple kuih I've done last week. Well, I'm just craving for some coconut last week, and I don't want to do anything complicated so this simple kuih just pop out from my mind. It was simple but delicious...^^


 It took less than and hour to complete this kuih, and it goes really well with a cup of hot green tea or black coffee. This kuih almost looks like the Pulut Inti, a kind of nyonya kuih. 

Ingredients for rice:
500g glutinous rice (soak for 1-2 hours)
1cup thick coconut juice
2 tsp salt
2 large banana leaves (washed and dried)

~ Lined up the 9" round pan with banana leaves.
~ Mix all ingredients together and pour onto the lined pan. Even the rice with a spoon.
~ Steamed at high heat for 30-35 minutes or until well cooked.


Ingredients for coconut:
150g grated coconut
20g castor sugar
60g gula melaka 
2 pcs pandan leaves
50-60ml water

~ In a wok add in water, sugar, gula melaka, pandan leaves and bring it to boil by stirringit all the time till sugar has dissolved.
~ Add in grated coconut and stir till the mixture has thickened. Leave to cool before use.

 Method of wrapping:
~ Place a pc of cleaned banana leaf on the table.
~ Spread cooked rice (about 5mm think) on the banana leaf.
~ Next spread the coconut onto the rice then roll up like a swissroll.
(make sure it's tight enough or else the rice and coconut may fell apart while cutting)
~ After rolling, leave the rolls to rest for about 5 minutes before cutting. (this to make the rolls stands to its shape)

Hope you like this! I'll be back for more post soon. 
Cheers!!

Thursday, May 24, 2012

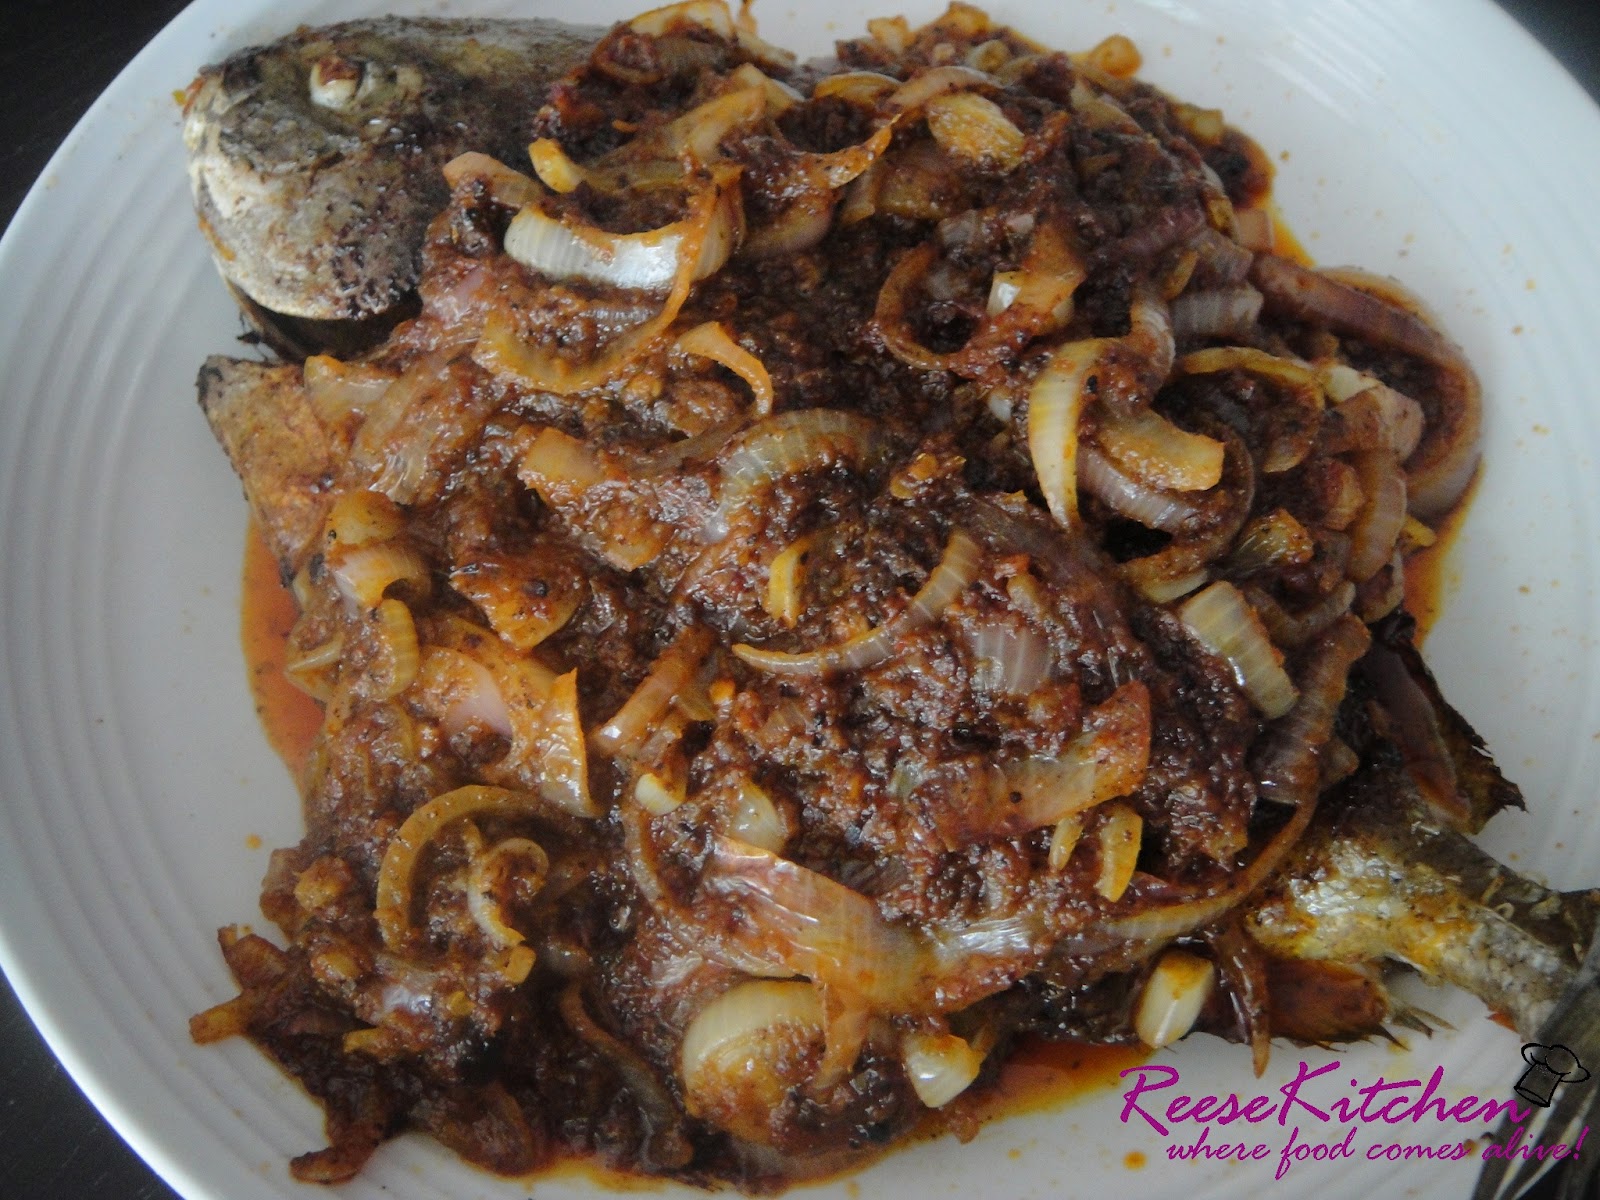
Sambal Fish

 This few days we (my daughter and I) are having dinner at my dear friend's house. Since my husband is overseas for few days so my friend has invited us to go for dinner instead. Dinner with friends are the best, we can chat and eat at the same time....and that means we'll gain weight in a way...haha! Cause we will never feel full when you eat and talk at the same time...;p

Well, I can't just go dinner with my empty hands right?! So today I've cooked something alittle hot and spicy for our dinner. Sambal Fish!! It was nice and just right to go with some hot steamed white rice...yummy!!


Ingredients for the paste:
(pounded)
20 shallots
2-3 stalks lemon grass
1/4 " fresh tumeric
5 red chilli
2-3 chilli padi
1 tbsp chilli paste
3-4 slices kaffir leaves
1/2 tsp lemon juice
salt and sugar to taste
2 tbsps cooking oil

~ Mix everything in a blender and blend everything together except salt, sugar and oil)
~ Heat up a wok with the cooking oil, then saute the ingredients till fragnant.
~ Add lemon juice, sugar and salt to taste.

Ingredients for the dish:
500g black pomfret
3 big onions (shredded)
2-3 tbsps water
* above paste (amount depends to individual, but I used all of it)
* cooking oil.

~ Marinate the cleaned fish with some paste for at least 30 minutes. Then heat up some cooking oil and panfry the fish (both sides) until brown and fully cooked.
~ Saute shredded onions until tender, add in the paste and mix well. Add water and bring to boil. Pour onto prepared fish, and served.

Cheers!!

Friday, February 10, 2012

Steamed Minced Pork Fillet with Salted Mackerel Fish (梅香鲛鱼)

It's dinner time!! Okay, I admit this is not very well presentable but it's a very well received dish. This is my childhood dish which my grandmother passed this to my mom and now it's my turn!!


The salted mackerel just bring out the right aroma of the minced pork, and I can have this, only this for my meals!! If you like the taste of this salted fish , you can never miss this!!


After taking the pictures of this dish, then only I realized that I should have garnish with some greens or reds to make it look more presentable at least alittle more colourful....haha! But nevermind, this is the original look for what I had for many years ago...LOL!!


The ingredients:


150g minced pork fillet

1 tbsp mashed salted mackerel fish

1 tbsp sugar

1 or 2 tbsps cooking oil

1 tsp corn flour

1/2tsp light soy sauce


~ Mix everything together and flatten it on a steaming plate for at least 30 minutes before steaming.

~ Steam at mid-high heat for 15-20 minutes. Serve hot with steamed white rice or plain porridge.


It's easy as 1,2,3 right? Simple and delicious....my favourite!!

My hubby asked why only after 20 years then only he got to taste this from me...haha! I told him, I just forgot about it!!


Have a nice weekend!!


Cheers!!

Wednesday, October 5, 2011

Shepherd's Pie or Reese's Pie???

Hi all, here's another recipe that I promised to share. This was the one that I've tried the other day together with the peanut kueh. This was my first time trying a shepherd's pie but somehow I'm not sure how is the actual recipe tastes like....;p This pie came to my liking when I saw my aunt's (Venorica's Kitchen) post last week. Its so easy and something different to serve for dinner instead of noodles or rice we used to have. (My daughter used to complain that she's bored with rice and noodles...haha!)


Well, if you are wondering why I decided to have such a title for this post, this was because of 2 reasons. First, I never try to eat a shepherd's pie before and secondly I've changed the ingredients to suit my very own taste. But of course this was inspired by my aunt...:)
Ingredients:
200g minced chicken fillets
6 small local potatoes (yellowish)
50g white button mushrooms (sliced)
** mozzarella cheese (depends on your liking, I used quite alot)
100-150g carbonara sauce (I used Prego's brand)
1 tbsp salted butter

Method:
~ First marinate the minced chicken fillet with some dried bazil leaves, alittle paprika powder, alittle black pepper and a pinch of salt for at least 30 minutes.
~ Cooked the potatoes until soften and mashed. Add in butter and mix well.
~ Saute the minced meat with 1/2 tbsp olive oil until fully cooked and add in the mushrooms. Stir well, off heat.
~ Then add in carbonara sauce and mix well. (If you find its too watery, then you may use less)
~ Spoon the cooked meat into prepared tray, top with cheese then followed by mashed potatoes.
~ Sprinkle some cheese on top of the potatoes if desire.
~ Bake at preheated oven at 200'C for 25 minutes. Serve hot!

This recipe served a 8x4" and a 6x2" trays. Can you believe that my daughter finished up the small one and asked for more...;p Oh she just love carbonara sauce and that's why I used that and cheese.....YUM!! Now you know why I named such title here...LOL!!!


Cheers!!

Monday, October 3, 2011

Peanut Santan Layer Kuih

I've been quite busy these few weeks and another 2 weeks to go then I can relax and enjoy my time slowly. You could probably wondering why...huh? Well, it's because I have to spend more time at the office now and back home, I got to do revisions with my daughter for her coming week examinations. Yes, it's very tiring rushing everything in a day, but this does not keep me from baking something nice and delicious..:)

Here's something I'll like to share today. Infect I've done 2 different recipes today!! One for dinner and this lovely kuih for dessert..:D I'll like to share this kuih recipe first then will find another time to share my "dinner" recipe with you!

A fragnant and sweet kuih, that you'll probably love it...Peanut Santan Layer Kuih (Peanut with Coconut milk layer Kueh)


A recipe adapted from "famous cuisine no.70" with alittle modifications.

Ingredients (A):
200g grounded peanuts (as shown as picture below)
60g rice flour
80g tapioca flour
10g green bean starch
200ml thick coconut milk
115g sugar
400ml water

Ingredients (B):
60g rice flour
80g tapioca flour
10g green bean starch
200ml thick coconut milk
115g sugar
200ml water
1/2 tsp salt

Method:
~ Combine ingredients (A) and (B) separately, strain well.
~ Prepare 8" round tray with lined banana leaf or just brush with alittle peanut oil.
~ Spoon batters in tray on sequence by different colour at about 150ml each layer. Covered and steam each layer for 3 minutes over high heat.
~ For the final layer, steam over high heat for further 20 minutes, remove from heat. Leave to cool completely before cutting.

This kuih (almost the same as the layered kuih, 九层糕 ) was so good, chewy and not sweet at all. Love the peanuts and it really goes well with the coconut milk! It was well recieved by my hubby and my daughter..:) My daughter likes to eat it by peeling it layer by layer, she said that's more delicious that way...haha!

I'll like to submit this post to Aspiring Bakers #12: Traditional Kueh (October 2011), hosted by SSB of Small Small Baker.


Cheers!!

Friday, September 16, 2011

Black Sesame Angku with Coconut Fillings

It's almost the end of the week again, and school will starts on Monday. Well, before I get into my daily routine next week, I better do something that I longed for. I miss this angku kuih that my mum taught me. I love the chewy texture when biting and I like the bean paste fillings but this round I'll make it with coconut fillings which my husband loves.
My mum gave me some black sesame powder which she made herself weeks ago. It smells so nice and I dare to say that those black sesame powder my mum made is much much much better than those selling outside. Love it, thanks MAMA!!
Without any hesitation, I tried it on the angku recipe she taught me with some changes in it.


Ingredients for Black Sesame Pastry:

200g Local White Sweet Potatoes (steamed and mashed)
290g glutinous rice flour
10g black sesame powder
1 tbsp rice flour
2 tbsps sugar
3 tbsps cornoil
210-220ml water

** May need more water depends on the quality of the sweet potatoes used.

Method:
~ Mix all ingredients together and mix by hand. (add water slowly)
~ Knead lightly until a soft dough forms and leave for 20-30 minutes before using.
~ Wrapped in fillings and sealed tight.
~ Dust alittle rice flour
on the mould and press the angku onto the mould and knock out gently.
~ Brush alittle cornoil on the prepared banana leaves and place the angku on it.
~ Steamed at high heat for 5-8 minutes (smallest size of the mould) / 8-10 minutes (for medium sizes)
~ Brush alittle cornoil on top of the kuih right after steaming to prevent from sticking to each other.

For the details of the fillings you can refer to my older post. (Bean paste or coconut)
If you ask me, I prefer the beans paste fillings than the others, I can eat at least 5-6 pieces in one go...haha! Crazy me!!

This new pastry recipe was a good one. And it was actually my mum's idea too. The taste of the black sesame does not overlap the fillings and it has a nice aroma of the black sesame...:) So far, I've tried this pastry with orange sweet potatoes, pumpkin, taro, beetroot and now black sesame. I wonder what else can I use...;p


Cheers!!

Wednesday, September 7, 2011

Long Bean Rice ~ My Mum's Style

Finally my hubby has recovered, means I can cook something alittle oily for him..;p Anyway, he still need more rest and healthy food to boost up his antibody..:)

Its alomost another week pass since school starts, but my daughter is looking forward to next week's holiday again. *Gosh*...why so many holidays??? That's because the school doesn't have a hall for the Standard 6 (UPSR) examinations, so the lower grade got to miss their lessons...:( This will make the kids getting lazier, but in another way, I have another week break...;p

Right, back to my post. this a dish / rice that I used to have since I was a kid. My mum used to cook this quite often for us. Maybe its easy and she only need to whip up everything in a pot then serve....haha! There are alot versions that I read from other bloggers about "long bean rice" but I just love the way my mum did...:)

Mom's recipe.....
2 cups rice (washed and soaked for 1 hour)
2 tbsps dried shrimps (soften)
200g long beans (cut into 1")
150g pork belly (thinly sliced)
10 shallots (diced)
550ml-600ml water (might not need all)

Marinade the pork belly with:
2 tsps sesame oil
1 tbsp light soy sauce
a dash of pepper

Seasoning:
1 tbsp oyster sauce
1/2 tbsp thick / black soy sauce
1/2 tsp sugar
~ add those seasoning into the rice (as shown below)

Method:
~ Panfry the shallots and dried shrimps until fragnant. Add in pork belly and stir fry alittle while.
~ Add in long beans and mix well.
~ Add in the rice with seasoning and mix well. Lower the heat and add in water (about 300ml) until just covered the rice (shown above). Simmer at low heat.
~ Stir rice every 5 minutes to prevent from sticking the wok or burn.
~ Add in water little by little and stir well while simmering.
~ Continue adding the water if the rice is not cook, and always simmer at low heat until cook.
~ Total cooking time is about 25-30 minutes.


We love this rice, and I usually cook this once every 2 months..:) Then till now I notice I did not post this before..hehe! Hope that you'll like this recipe as much as I do.


Cheers!!

Friday, August 5, 2011

Steamed Chicken in Lotus Leaf (荷香盐蒸鸡)

Its Friday! Can't wait for our weekend activities again...:) What are you going to do this weekend? We have not much to do, as usual to the park and shopping but spending the weekend with the family is the best!!

Today's dinner...steamed chicken. Since I have lots of lotus leaves left, so I decided to use it for today's dish. Recipe was adapted from my latest book collection, "Flavours From My Kampung" (小城滋味多) by Bryan Ong.

Ingredients:
1/2 chicken
2 slice angelica (dang gui)
1 tbsp chinese wolfberry (qi zi)
8 red dates
1 tbsp shredded ginger

Seasoning:
1 tsp salt
1 tbsp light soy sauce
1 tsp sesame oil
2 tbsps shaoxing wine

1 piece dried lotus leaf, blanced till soft in hot water and drained.
1 piece aluminium foil


~ Marinated the chicken with all the ingredients and seasoning for at least 30 minutes.
~ Place lotus leaf onto aluminium foil, put marinated chicken onto the leaf (as shown above) and wrap tight.
~ Wrap the aluminium foil tightly as shown below and place on a steaming plate.
~ Steam over hight heat for 45 minutes. Serve hot.


This dish is so good to go with a bowl of hot steamed white rice...yummy! Try it out then you'll know what I'm trying o tell you.


Have a nice Weekend!!!

LinkWithin

Related Posts with Thumbnails