Showing posts sorted by relevance for query cream cheese. Sort by date Show all posts

Wednesday, July 13, 2011

Cotton Cheese Roll with Mocha Cream

My husband is out of town again, and that means I don't have to work for few days..hehe! Good, then I'll pamper myself with some shopping, meeting with old friends and also alittle pedicure & manicure..haha!
Let's start with some cakes for my supper later.........
I want some cheese cakes, and the same time I want some coffee cakes. Well, at the end I combined both...;p This was the first time I went into a bakery supply store without my list. I just grabbed some cream cheese and butter and hopefully I have everything I need at home..;p When I reached home I just started off with what I have and turn my idea into a swiss roll....a cheese cake roll...LOL!


I'm quite satisfied with the result actually. The texture turns out good and the cheese and coffee I wanted in the cake were there too...so it's DONE!! Let me show you what I did.....;p

The ingredients for the cheese sponge:
120g sugar
6 egg whites
1/4 tsp cream of tartar

50g butter
250g cream cheese
100ml fresh milk
6 egg yolks
1 tbsp lemon juice

60g superfine cake flour
20g corn flour

** 2 tsps cocoa powder (for the flower prints ) ~ optional

First, I melted the cream cheese, butter and milk over a double boiler. Then cool the mixture completely. Then Add in egg yolks and lemon juice and mix well.
Second, I whisk the egg whites with cream of tartar until bubble forms and add in the sugar gradually and whisk until a soft peak forms.
Third, I took out 1 tbsp of egg yolk batter and 1 tbsp of egg white mixture and add with the cocoa powder. Spoon into the piping bag and piped some flower prints on the prepared tray. Bake this flower prints at 180'C preheated oven for 1 minute then remove from oven and set aside.
Fourth, I fold in the egg whites into the egg yolk batter and mix well. Pour onto the prebaked printed flowers and level the top. Back into the oven and bake at 180'C for 20 minutes.


Notice that the steps are similar to the printed Strawberry Swiss Roll? Yeah, I've converted the whole thing here but I realized that the finale bakes for the sponge cannot be 12 minutes. Think its because of the cream cheese added and the sponge needed slightly another 5 minutes.
Lastly, spread the whipped Mocha cream on to the cooled sponge and gently roll up the cake. Please becareful while rolling, this sponge is alittle heavy compare to the normal swiss roll.

Ingredients for the Cream:
1/2 cup non-dairy cream (whipped)
1 tsp mocha paste
1 tsp coffee paste
** Mix everything together and its ready for spreading.

The sponge texture and taste are quite similar to those Japanese Cotton Cheese Cake. It really goes well with the Mocha cream. Trust me, if you like to have a light cheese cake and some coffee cream, this is definitely for you.

Monday, May 4, 2009

Cream Cheese Raisin Bun

Cheese, Cheese, Cheese.....is my daughter's favourite. So i came across this recipe from Don Yong Bread Winner which i didn't try before. Luckily it turned out fine..;P It's not difficult but need time.....waiting! I made into small tiny buns....looks 'cute'....hee hee! Do have a try, you'll love it


INGREDIENTS:
400g Cream Cheese
60g Sugar
500g Bread Flour (High Protein Flour)
8g Bread Improver
10g Dry Wheat Gluten
13g Instant Dry Yeast
8g Salt
125g (2 Large) Eggs
100g Cold Water
200g Raisins

TOPPING:

Walnuts (Whole) / Almond Flakes
Cream Cheese
Poppy Seeds (Optional)


METHOD:
~ With an electric mixer and paddle on medium speed, mix cream cheese & sugar for 2 minutes until softened.
~ Remove the mixture and attach a dough hook. Mix all dry ingredients together for 1 minute on slow speed.
~ Add eggs then water and continue mixing on slow speed for another minute.
~ Change to medium speed and mix for 5 minutes. then add in the cream cheese mixture.
~ Continue to mix for another 7-10 minutes until dough is fully developed.
~ Mix in raisins on low speed for 1 minute, making sure not to crush the raisins.
~ Transfer the dough to a flour-dusted surface and round up the dough.
~ Place dough into an airtight container and let it rise for 1 hour until dough is double in bulk.
~ Divide the dough into 80g (40g for mini buns) each.
~ Round up and rest the dough for 10 minutes, then remould into balls
~ Place 4 dough balls together (or desire shapes) and prove for 45-50 minutes until doubles in size
~ Brush beaten egg over the dough, place a walnut or some almond flakes and pipe softened cream cheese over it.
~ Sprinkle poppy seeds ( which i avoided) and bake for 15 minutes at 200'C until the top turns golden brown.


Wednesday, October 20, 2010

Strawberry Cream Cheese Buns

Lately I've been trying to bake more breads and buns instead of cakes. Got bored on cakes..haha! And so bread becomes our daily food....for breakfast and tea. All kinds of buns but using the same recipe of sweet dough then I discovered a new method from my collection of bread recipe book. I don't remember when I bought this book (Magic Bread from Alex Goh) but it was well kept in my shelf with the wrapper..haha!

Okay today's bake is buns....Strawberry Cream Cheese Buns. The title itself already makes my saliva dripping..haha!

Don't they look lovely?!!

This time I've tried with different technic of the sweet dough. "Gelatinized dough"...it was first introduced by Japanese chefs and the result was soft and springy. This recipe was adapted from Magic Bread by Alex Goh.

Ingredients for the sweet dough:
(A)
100g Bread flour
70g Boiling water

(B)
300g Bread flour
100g Plain flour
80g Sugar
6g Salt
20g Milk powder
9g Instant yeast

(C)
175g Cold water
60g Cold eggs

(D)
60g butter

Method:
~ Mix well (A) to form dough. Cover and set aside to cool. Keep refrigerator for at least 12 hours.
~ Mix (B) until wel blended, add in (C) and knead to form rough dough. Add in (A) adn knead until well blended.
~ Add in (D) and knead to form elastic dough. Let proof for 40 minutes.
~ Divide dough into required weight and mould into round balls and let to rest for 10 minutes adn ready to use.
Prepare the cream cheese shown above......
125g Cream cheese
50g sugar
50g whipping cream
10g Instant custard powder
2 tbsps Strawberry fillings
~ Cream cream cheese with sugar till light. Add in whipping cream and cream until smooth.
~ Add in instant custard powder and mix until well blended.
~ Add in strawberry fillings and mix well.

Prepare the Streusel topping......
60g sugar
50g butter
100g bread flour

~ Mix sugar and butter until crumbles by using finger tips.
~ Add in flour and mix until crumbles. Keep in refrigerator before use.

Method for Strawberry Cream Cheese Buns...
~ Divide sweet bread dough into 70g each and mould it round. Roll out each small balls into long stripe and twirl around to form a circle and place on a parchment paper on a tray.
~ Egg wash the surface and pipe the strawberry cheese fillings following the twirled lines and sprinkle some streusel over it.
~ Bake at 180'C for 15 minutes.
My cute babies are ready to go in the oven....:)


Here they are......crispy on top and soft at the bottom...beautiful!! Super nice to go with a cup of tea which I'm having now...;p

I'm so happy for myself for trying a new recipe which I don't have the courage to do all the time.
Bravo...to myself..haha! Hope you like this too....^^

Happy weekend!!


Thursday, May 7, 2015

Beetroot Cupcakes with Cream Cheese Topping

This is a fine cake that you must try. Highly recommended for the texture and the delicious taste. I never thought they would taste that good because I'm not a fan for beetroot but surprisingly there were good. Trust me, they were really good! Texture were soft and fluffy, goes really well with the cream cheese icing.
By the way I was expecting the outcome will be pinkish red but they were brownish instead, maybe I'll reduce the cocoa powder the next round when I try. 


(Makes 12)
Ingredients:
2 cups cake flour
1 tsp baking powder
1 tsp salt
1 tbsp cocoa powder (has been reduced to maintain the red colour from the beet)
1.5 cups sugar
1 cup corn oil
2 eggs
1/2 cup fresh milk
1 cup beetroot (cooked & blended)
2 tsps vanilla essence
1 tsp white vinegar


Method:
* Preheat oven to 170'C
* Lined paper cups on cupcake mold
* Mix together cake flour, cocoa powder, baking powder and salt in a bowl.
* Whisk sugar and corn oil in a mixer, add in eggs, milk, blended beetroot and vanilla until combined.
* Stir in white vinegar.
* Combine the wet ingredients with the dry ingredients a little at a time until well combined.
* Spoon the batter into prepared cups.
* bake at 170'C for 20-25 minutes. Cool completely before topping with the cream cheese icing.


Cream Cheese Topping:
125g Cream Cheese
60g Butter
60g Icing sugar

* Beat them all together in a mixing bowl until creamy.
* Using a piping bag with a flower nozzle, pipe the icing onto the cooled cupcakes and top with some toasted walnuts if desire.


Cheers!


Saturday, December 4, 2010

A Surprise Birthday Cake (Black Berry Cheesecake)

Surprise surprise!! Today is another of my dear dear friend's birthday..:) I gave her a surprise!! Of course its a cake, what else?!...haha!
Since she's staying nearby, I surprise her by sending the cake over in the morning once she wakes! And a birthday song was sang while she's still in her pyjamas...lol!

This is a cheese cake which was my 1st attempt. Luckily it turns out nicely or else....stress!!
A Blackberry Cheese Cake by Kevin Chai. Love the taste of the blackberry mixed with the cream cheese...yum yum!

Layered of vanilla sponges was added, and the result is perfect! Somehow the sponges can be avoided if you like a more cheesy cake.
Recipe adapted from the book Cheese Cake with Kevin Chai but with my own version of vanilla sponge and some changes from the original recipe.

Ingredients for Vanilla Sponge:
250g eggs (weigh without shells)
110 sugar
125g plain flour
50ml water
2 tsps emulsifier
1 tsp vanilla
60g melted butter

Method:
~ Whisk all the ingredients except melted butter at high speed until light and fluffy.
~ Then fold in melted butter and bake in a 9" square tin lined with parchment paper for 40-45 mins at 180'C. Cool and sliced into 2.

Ingredients for the Cheese:
350g cream cheese
115g sugar
120g black berries (blended)
1 tbsp gelatine powder
3 tbps water
350g whipping cream (lightly whipped)

Method:
~ Beat cream cheese with sugar until smooth, stir in blended black berries.
~ Melt gelatine powder with water over simmering water. Stir into cheese mixture. Then fold in whipped cream.

Display:
~ Place a slice of vanilla sponge into a 8" square loose base tin. Spread in half of the berry cheese mixture. Cover with another sponge cake. Top with remaining berry cheese mixture and smooth the top.
~ Chilled in fridge for over night. Remove cake and decorate as desired.


Happy Birthday Grace...!!


Wednesday, July 25, 2012

Rapsberry & Cheese Delight

Special treats for my niece! Thinking what to bake for her on her birthday but instead of cakes that will make her fat....so this light desert is what I think will suits her since she's on a diet...LOL!! Anyway...cheese...hmm is fattening though...haha!
Well, this is not very special from any special chef's recipe. It's just something she loves..."rapsberry & cheese"...so I just combined them and put it in a cup. Looks tempting though....^^


Very easy and it was done within an hour. No bake and no fuss!! I personally like the combination and the colour of the cream cheese...beautiful! The tatse?!...PERFECT!!

Ingredients:
170g rapsberries
250g cream cheese
100g whipping cream
75g sugar
150g digestive biscuits
30g butter (melted)

Method:
~ Mashed the rapsberries and keep aside.
~ Beat cream cheese, sugar and whipping cream till fluffy.
~ Mix in the mashed rapsberry and sti well.
~ Smashed digestive biscuits into crumbs and add in melted butter and mix well.
~ Scoop the biscuits follow by the rapsberries cream layer by layer into a cup.
~ Chill before serve.


See the biscuits and the cream?! Melt in the mouth and appetizing...wonderful!!
Try it and you'll know. Its easy as ABC...:))


Cheers!

Saturday, June 11, 2011

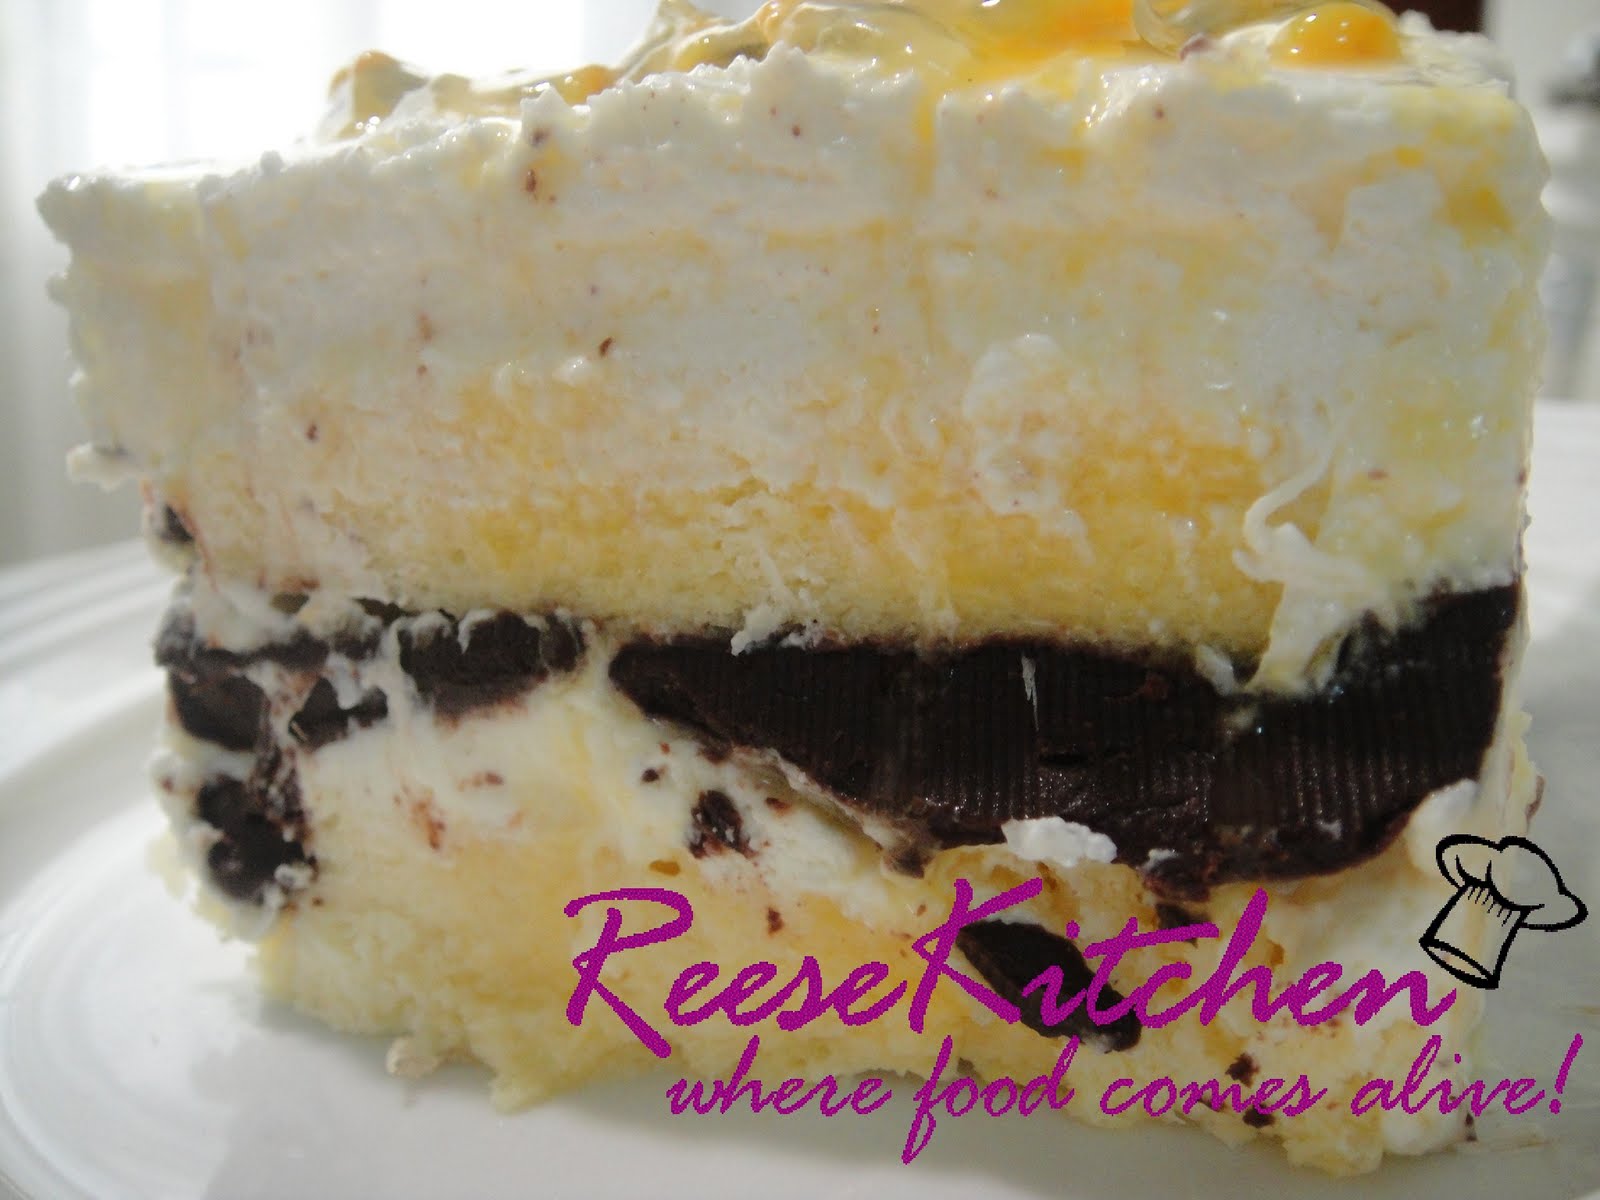
Passion Fruit Cheesecake with Chocolate

Its the last day of school holiday in Malaysia. Everything will be back to normal tomorrow...:( How I wish my holidays don't ends..;p Well, to celebrate the last day of holiday, I created a cheesecake but its not a cheesy type cheesecake..haha! What am I talking about...;p
Okay, the idea just came across my mind when I was shopping at the groceries yesterday. So here is it..Passion fruit Cheesecake with Chocolate!!


I just mixed and matched the recipes from here and there then I feel like eating it with some chocolate. Then was thinking to coat the whole cake with chocolate but it seems like too sweet or too heavy, so at the end..layered them is my final decision.
Want to try this out? Here's the recipe ...


Composition: ( recipe fits for a 7" round pan)
2 slices sponge cake ( I've cut into small rectangles to fit into 2 small rectangle pans )
** Recipe refer here.


Cheese filling:
250g cream cheese
70 caster sugar
80 fresh passion fruit juice
3/4 tbsps gelatine powder
2 tbsps water
250g fresh cream (whipped)
100g melted semi-sweet chocolate


Method:
~ To make the filling, beat the cream cheese with sugar until smooth, stir in passion fruit juice.
~ Melt gelatine powder with water over a simmering water. Stir into cheese mixture, then fold in whipped cream and mix well.
~ Place a slice of sponge into the prepared pan, spread about half an inch cream cheese filling on top of sponge, spread a thin layer of melted chocolate then place another layer of sponge on the chocolate. Lastly cover the top with cheese mixture. (as shown above)
~ Chill overnight and serve cold.


The texture of the sponge is soft, and it's like eating an ice cream cake! My whole family loves it especially my daughter. She has been asking one slice after another, that really please me..:)

Want to have a bite..hehe! I'm going to share with my dear friend later and see what she says..;p


Have a good start tomorrow!!


Cheers!!

Monday, June 1, 2015

Cotton Cheese Cake

Cotton Cheese Cake also known as Japanese or Sakura Cheese Cake was popular in Malaysia more than 15 years ago, at that time emulsifier was used to give a better texture for the surface. There are lots of recipes posted in the web about this cake, and I just love it my way as adapted from one of my favourite books..."The Joy Of Baking by Bake with Yen"


I didn't share this recipe when I first baked this long long time ago because at that time I have not started to blog yet. So just imagine how long was that be....I can't recall too!
With little adjustment on the sugar and some changes of the recipe, here is the recipe to share with you and also for my own reference.


Ingredients:

135g fine sugar
6 egg whites (size B)

50g butter
250g Philadelphia Cream Cheese
6 egg yolks (size B)
100ml fresh milk
1 tbsp fresh lemon juice

60g Superfine Cake flour
20g Cornflour


Method:
~ Line a 9" round pan with parchment paper and wrap the outside of the pan with aluminium foil.
~ Preheat oven at 160'C and place a slightly bigger tray filled with hot water for steam-bake.
~ Sieve both flours and set aside.
~ Melt cream cheese, butter and milk over a double boiler. Slightly cool down and add in egg yolks and lemon juice. Use a egg whisker to mix gently until well mix. Set aside.
~ Whisk egg whites with sugar until slightly stiff (don't over whisk)
~ Mix in flour mixture into egg yolk batter and stir until well combined.
~ Mix in the whisked egg whites slowly until well combined.
~ Pour batter into the prepared cake pan and place the pan into the prepared tray of hot water.
~ Steam-bake at 160'C for 1 hour and 10 minutes.


If you want to have a cheese cake but a lighter one, this is what you should try.
Love the soft texture, the light taste of cream cheese and a tinge of lemon, perfect for afternoon tea or supper...hehe!

Cheers!

Friday, May 14, 2010

Happy Teacher's Day!!

"Happy Teacher's Day" to all teachers out there and "Happy Teaching"...;)

My girl has been asking me to bake a cake for her teachers to celebrate Teacher's Day today at her school. Well, its a last minute notice actually, so I searched through my house, all I can bake is a cheese cake I told her. She said ok, and she start looking for the decos for me..haha! At the end we did went out to get some fresh blueberries and mint leaves.;p


Just something simple here coz I don't have enough time to whip some cream to it. Well, guess cheese cakes doesn't need any cream though. A similar recipe from the Chocolate Marble Cheese i did previously. Only spoons some blueberry fillings in the center of the cheese batter before cover it with the remaining cheese. Then bake, cool, glaze and deco..:)


Packed and sent to school this morning and asked teacher to reserve a piece for me to take a picture inside..hee hee..;p


Here is it...a look at the yummy cake! Hope the teachers enjoy the cake and once again I'll like to wish all Teachers...."HAPPY TEACHER'S DAY"!!

*******************************************
Well not to forget about myself..;) Made myself a yummy Mango Cheese Cake for tea!
A simple recipe adapted from my aunt's friend. Well she demonstrated this cake while selling her mixer. Anyway, we didn't buy that particular mixer but took home this lovely recipe..hahaha!

Share it? Sure....here is it!
Base:
300g Digestive Biscuits (crushed)
100g Butter (melted)
Filling:
(A)
200g Mango Puree
50ml Mango juice
1.5 tbsps Gelatine
(B)
375g Cream Cheese
100g Castor sugar
1 tbsp Lemon juice
200g Whipping Cream
~ Mix the melted butter with the crushed biscuits and press onto a 9x9" loose base pan. Freeze.
~ Cook (A)-double boiling, until gelatine disolve and cool.
~ Beat cheese and sugar till creamy
~ Add in lemon juice then (A)
~ Beat whipping cream until firm and mix into the cheese mixture.
~ Pour onto prepare pan and chill until firm
Topping:
300g mango puree
75ml mango juice
1 tbsp Castor sugar
3 tbsps Cornflour
~ Cook ingredients in a pot until sugar disolve and turn slightly thick.
~ Cool slightly and pour onto firm cheese cake, chill again until the topping turns firm.
~ Cut and serve!


Hmmm....its just too delicious to say no for 2nd and 3rd piece..;p
Have a nice weekend everyone!!!


Tuesday, July 20, 2010

Durian Cheese Tarts

Hi there, how are you? I've been absent for sometime, and friends have been asking why there is no new post lately..;p I did bake but all old stuffs like chiffon cake and baos. (requested by my daughter) With only 3 of us, those food need some time to finish..;)
Alright, enough for my excuses...bla bla bla..;p

Are you a durian fan? I am, and I'll go crazy with this fruit! The past 2 weeks I've been craving for durians. I just can't let it down..haha! Yesterday while my daughter and me went out for dinner at the nearest mall, I saw some durians!!! And I was like walking faster and faster to that stall, and my girl asked me "mummy why are you rushing"? I told her I saw durians!..haha! Crazy me!


After almost 20 seeds of durians, I thought of saving some for these tarts. Aren't they look lovely..;)


Transform my blueberry cheese tarts's recipe into durian cheese tarts. And top with fresh cream and durian....Wonderful!

Did a small tiny one for my girl to try. She doesn't really like durian, hopefully she'll like this.
A peep the inside of this tart, the soft and creamy fillings are just right to match with the crust pastry.

Here's my version of the fillings:
250g Cream cheese
50g Durian flesh
50g castor sugar
20g butter
1 egg

~ Beat the cream cheese, sugar and durian until light and fluffy.
~ Add in egg and beat well.
~ Transform the cheese mixture onto the baked tarts shells.
~ Bake at 180'C for 15 minutes.
~ Cool and pipe cream topping on top.
~ Chill before serve.
Topping:
250g Fresh cream
20g Durian flesh
~Beat together until its almost stiff.

Cheers!!


Sunday, August 16, 2015

Cream Cheese Chiffon

It's been awhile since my last post. I still bake and cook but with all repeated old recipes. Sometimes we need to taste something that we tried long time ago especially those we really like. 
Today, something new to add into my list here, a Cream Cheese Chiffon Cake. First try and it taste good and texture is really soft but.....as you can see my first picture here...all CRACKED!!!...hahaha!
Well, don't judge the book by it's cover right?!..(@@)"


Self-created recipe that I'm quite please with...hehe! It was a melt-in-the-mouth texture that I'm looking for. ^^


Recipe calls for a 9" tube pan.

6 egg yolks
150ml fresh milk
4 tbsps cornoil
1/4 tsp salt
150g cream cheese (lightly beaten)
2 tsps lemon juice
140g cake flour
50g castor sugar

6 egg whites
100g castor sugar


Method:
~ Preheat oven at 170'C
~ In a mixing bowl lightly beat the 50g sugar and salt with egg yolks until bubbles formed.
~ Add in corn oil and milk, mix well
~ Add in beaten cream cheese and lightly whisk until all well blended.
~ Add in flour and mix well. Set aside.
~ Beat egg whites with 100g sugar until soft peaks formed.
~ Gently fold beaten egg whites into the egg yolk batter until blended.
~ Pour batter into a 9" tube pan and bake at 170'C for 40 minutes.
~ Remove from oven and invert the cake onto the table until completely cool.

Cheers!

Friday, April 2, 2010

Chocolate Marble Cheese Cake

Do you like cheesecake? I love it...:) It has been my pleasure to make a cake for my dear friend, Bee Bee. She has come visit us again...YEAH!! We really miss her alot since she left last December. And I've lost a great baking companion since then...;p So glad that I can bake something for her today...:) Although the outlook is not what I expected (alittle overbaked on the top), but the inside still can be excepted. Hee hee...pai-seh larr!


We actually had an expensive dinner before we had our dessert. What I mean expensive is really over charged. Just imagine we spent almost RM200 at the restaurant just serving chicken rice and some normal dishes. The food, hmm....can be excepted but not the price.

Anyway, after the dinner we head to the nearest A&W to have our dessert. Yup! My cake...haha! Luckily nobody complain that we brought our own food to serve there. We did order some rootbeer and fries for the kids though...^-^ A very nice chat at a very nice place...:)


Here's the recipe for you....

(A)
120g crushed Digestive biscuits
120g melted butter


(B)
1 kg cream cheese
4 small eggs
1 lemon rind (grated)
70g plain flour
280g sugar
100 double cream (lightly whipped)
1 tbsp lemon juice
20g melted chocolate

Method:
~ Preheat the oven at 150'C with a tray of water.
~ Mix (A) together into a 9" round loose base pan which wrapped with aluminium foil outside. Keep aside.
~ Cream cheese and sugar together until light, slowly add in eggs.
~ Then add in lemon rind and juice and mix well.
~ Finally add in double cream and flour.
~ Spoon out 3-4 tbsps (or more) to mix with the melted chocolate.
~ Pour the plain cheese batter into the pan with (A) at the bottom. Then top with the chocolate cheese batter. Use a chopstick to make a marble effect.
~ Bake at 150'C for 2 hours over a tray of water.
~ When baked, chill and demould.


Chocolate with cheese, a lovely combination. Agree? And goes with a cup of coffee. haha! Yea, I actually ordered a cup just now...;p

Hope everyone like it............Cheers!

LinkWithin

Related Posts with Thumbnails